Fabric Scores, One Block Wonder Blunder, My Quilting Journey

 I found a great deal at Hancock's of Paducah.  Honestly, I find many superlative deals there.  I recently purchased  2 Fat Quarter Bundles

Here is the Andover Fabrics Laundry Basket Quilts Secret Stash Warm Fat Quarters.  There are 20 fat quarters for $39.99.


I also bought the 20 Cool Fat Quarters for $29.99..I'd give you a pic, but at that price, they are long gone.  Both are fabulous deals.  I find that  I get the best deals on fabric from Hancocks.  I also got a 10% off coupon which I was able to apply. 

To get free shipping (they have a reasonable $5 flat rate) I had to spend $70, so I bought a Mari Michel 60 degree corner trimmer.  It is small, and I can use this to mark hexagon stitch points as well as make a small triangle quilt.  

I've not done much with triangles until I tackled my OBW.  I'm so happy with how my sizing up (from 3.75 to  3.875 (7/8) has improved my ability to have each of my blocks the perfect size.  I lamented in a previous post that some of blocks were wonky despite my taking the greatest care in cutting, sewing and pressing.  Slightly upsizing (and I have no problem working/measuring with eighths) and then trimming slivers to have perfect blocks for perfect points will be welcome.  

Perplexed or One Block Wonder Blunder:   Even though my OBW fabric choice was halved lengthwise (meaning I would have exactly enough for a sister quilt), for some reason I was not able to 6 repeats from the remaining half.  I'm thinking that I cut my side hexagons halves from it, which would explain the shortage. Now, that was REALLY poor planning or more poetically stated as a One Block Wonder Blunder). Therefore, (UGH!), I'm only able to get 1/2 the blocks (I got 49 blocks out of the first).  I'll work it out to put some contrasting blocks into the layout or simply use full v. pieced hexagons in the quilt.  OR...I can make Posie blocks (made from 4 squares) that I cut into a hexagon.  In fact, I think that I'll do that.

I am now entering my 3rd year as a quilter.  I'm a long way from embarrassment and longer way still from mastery.  However, I can make pretty quilts.  My interest is not so much in free motion quilting largely due to my domestic machine not having but 7.5" of harp space.  My newer Bernina (B530)has the BSR which is lovely, but with a narrow harp, it really is a hassle to move your fabric about.  

Nevertheless, I have no remorse in doing straight line quilting.  Have walking foot, will travel! Over this next year, I would like to develop my free motion quilting skills.  If I were to simply spend 20 minutes daily practicing, I'm sure my skills would improve dramatically.  It is all about building muscle memory. 

But the truth of the matter, there are few people in my life that would appreciate the quilting more than the quilt itself.


One Block Wonder Followup | Strip Width

 I cut my OBW using the recommended 3.75 strip width.  I had some surprising (alarming, disappointing) variations in the height of my blocks.   Now that I have a 6.5" hexagon ruler, I wanted to use this ruler to trim down my blocks.  My OBW blocks, even though carefully cut and sewn ended up with some surprising wonkiness...Sewing 6 triangles with 12 edges of bias will do that

First I did my normal block at 3.75" with careful seams and pressing.  Even though I exercised great care at all stages, I  still ended up with "some here and less there" when I lay the ruler on top of the block. 

I experimented with a 4" width. I had to trim too much off. 

Next up. . . .  I went with 3 7/8ths and that worked out perfectly.  I cut just a small amount around to end up with a perfect 6.5" height block. I will use this size in the future to give myself some wiggle room.  I really want my next whack at the OBW to be perfect, as I will gift it.  Having a ruler to help me "square" the block up nicely will go along way toward improving the end result.

If you are making 6.5" OBW, I highly recommend a hexagon ruler and adding an extra 8th of an inch to your strip width.  It gave me a perfect trim down with negligible waste.


Unpicking

Unpicking:  I had to unpick an entire binding on a quilt because I simply didn't notice that my needle position was in the middle rather than the far right (necessary because of my walking foot).  Accordingly, my seam widths was such that  I could not wrap the binding to front to save my life.  I left it that way for a few weeks--hoping it would miraculously heal itself.  It did not. Yesterday I tackled it.

My favorite unpicking tool is my Havel seam ripper.  It plus whatever entertainment I have on my portable TV monitor + Fire Stick makes short work out of long, arduous tasks. I ripped out the binding, tossed it because it was not usable; made new binding; sewed it on.  I now have 8 Sparkle Magic Shine quilts for the New Kent Christmas Mother program this year. These will be perfect for 0-3 year olds girls.

Enjoying quilt made for self.  The quilt I finished for myself is something that I'm really enjoying using. I'm reminded that no one is ever going to see that your points are not perfect once the quilt is washed. For this quilt, I put a 108" quilt backing in a dark grey print and bound with same. (below is just the quilt top. )

Most of the fabrics are from Anna Maria Horner's Skipping Stones collection which I filled in with some other fat quarters that I had that I felt complemented the fabric.


I love these de-saturated colors.  When I was cutting my quilt batting, I got the fabric out of kilter, and I had to piece some fill in pieces.  It was a pain...but you couldn't look at the back of the quilt and see it.

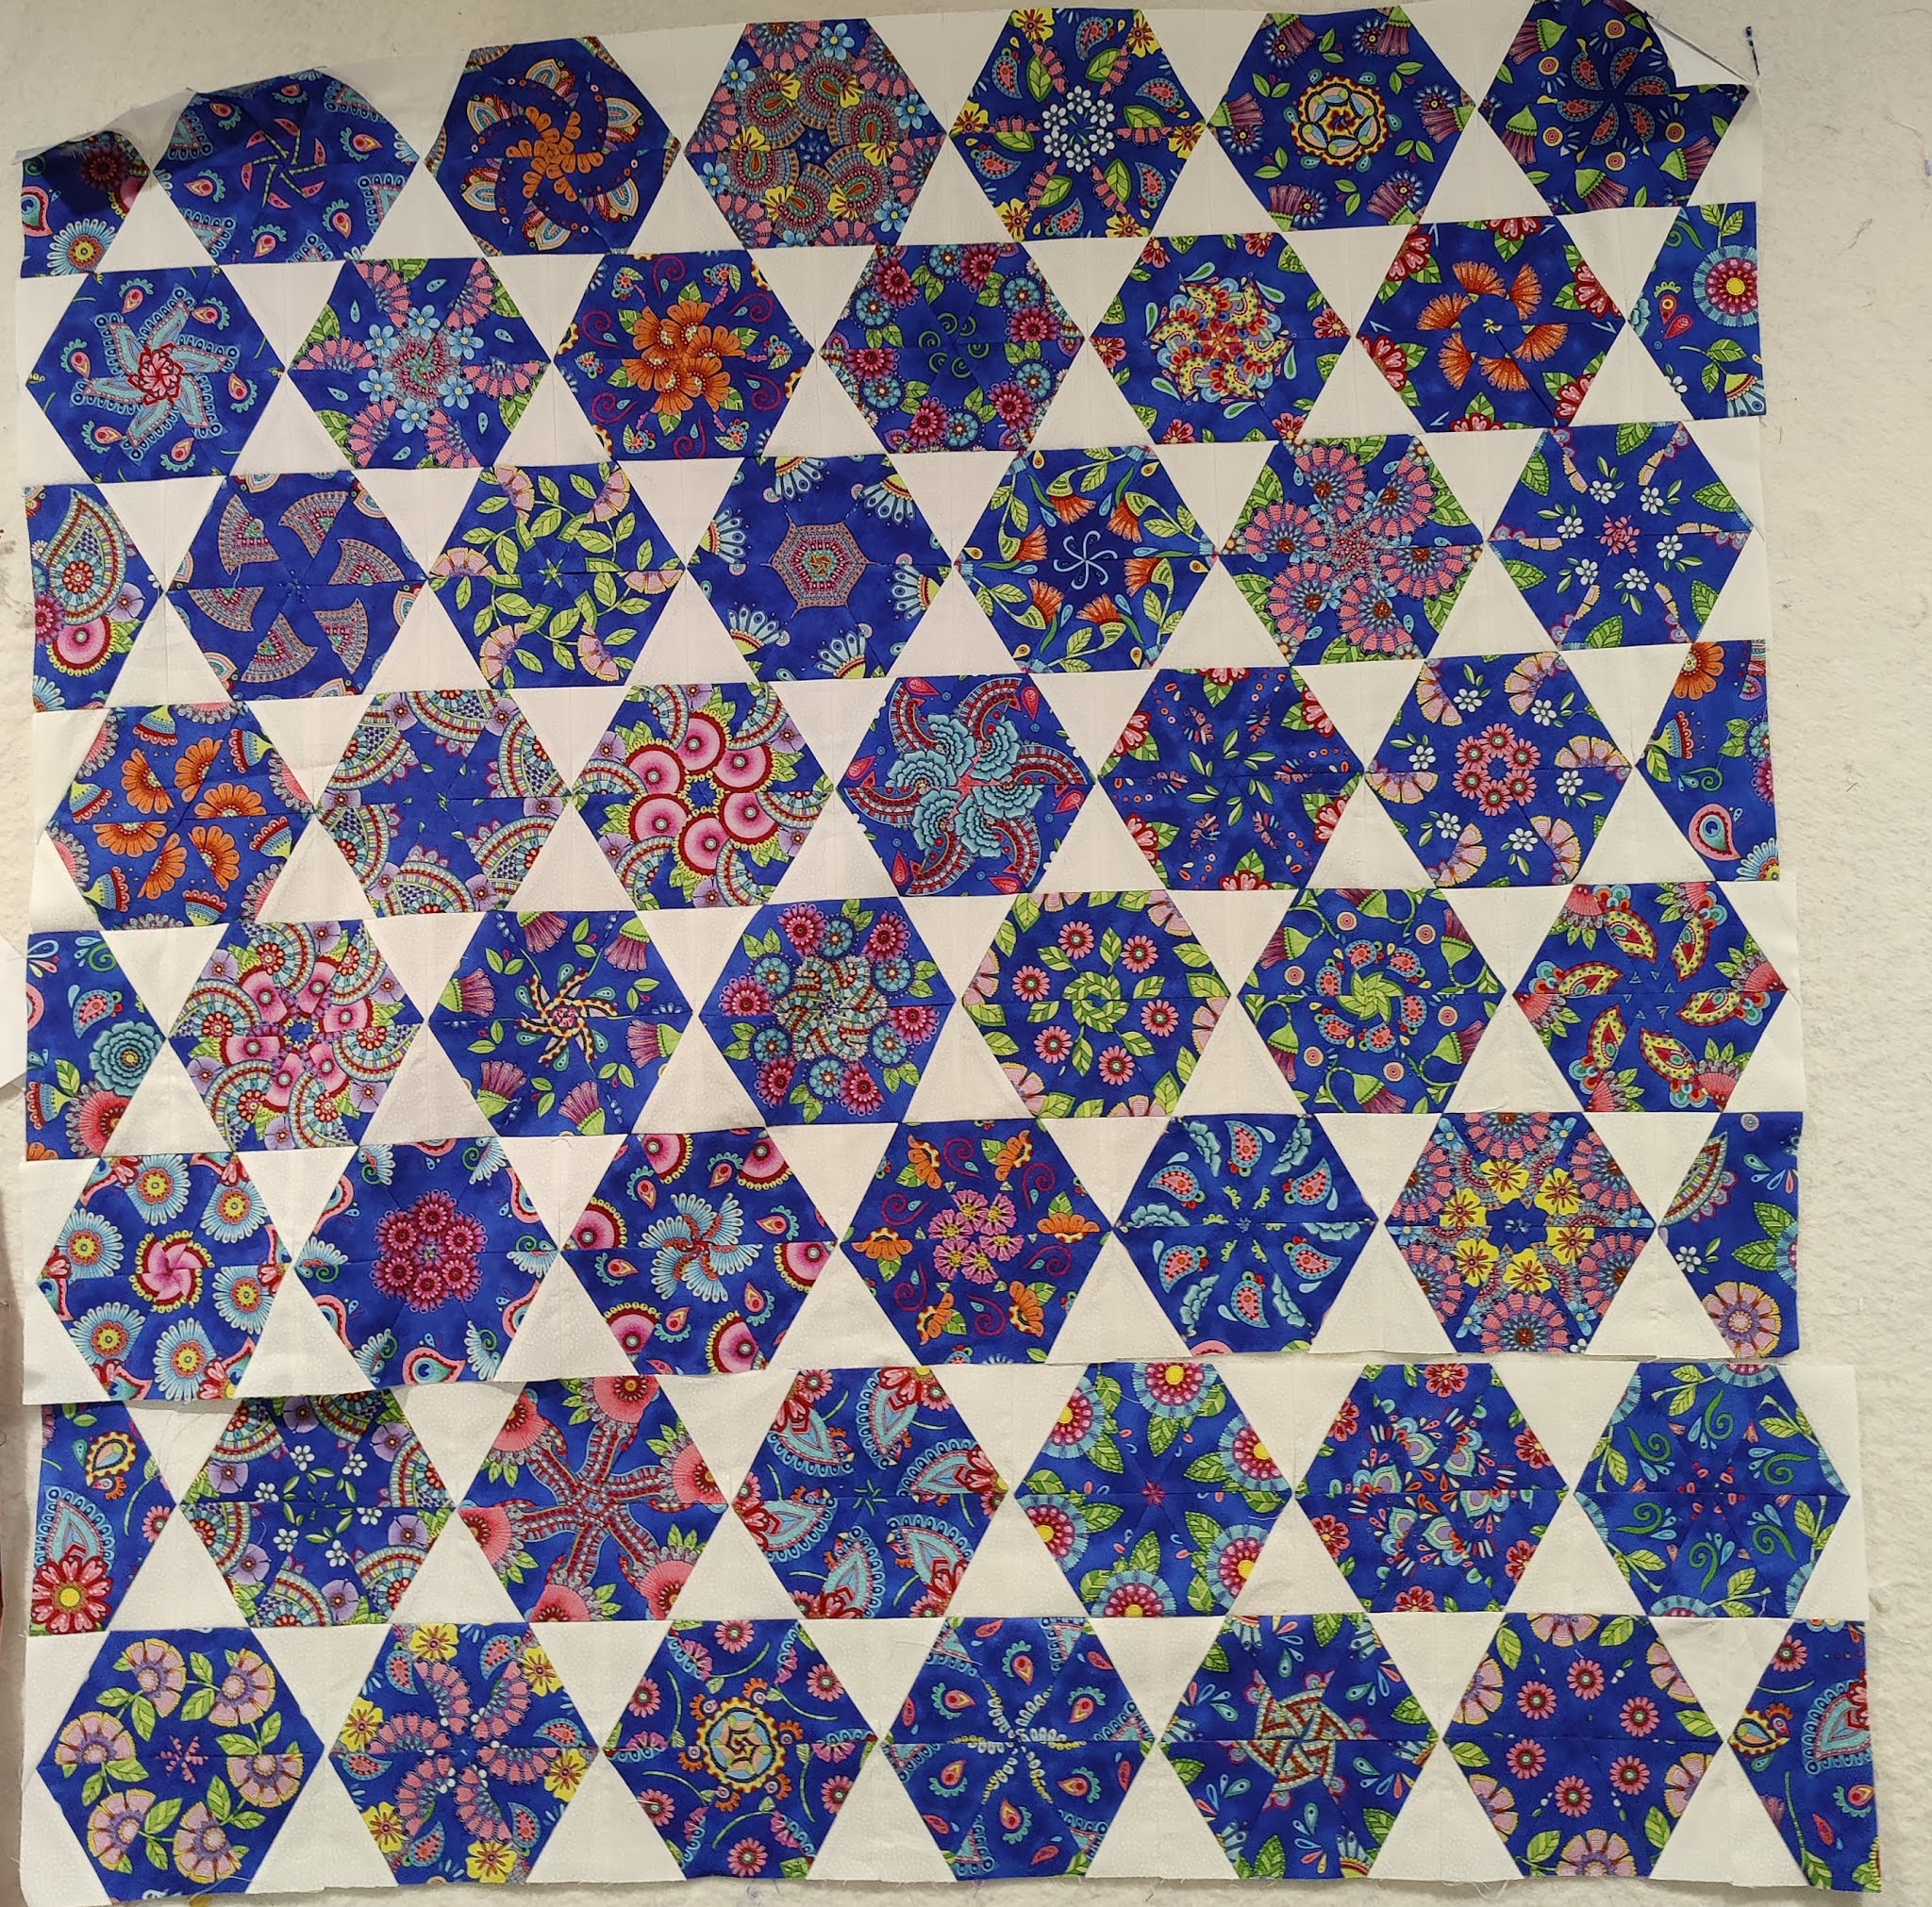
One Block Wonder:  As my quilt blocks were so unique, I elected to put them in a hexagon star quilt. This was my first time sewing this block.  I'm confident that my piecing was accurate, but I may have had a different strip measurement on one of the rows which made some of my hexagons about 1/4" (and a fat measurement at that).

When I put the rows together, my points are pretty far out on several blocks due to the "trimming" I had to do which messes up where "stuff" will line up when piecing rows together.  I think that I'm going to keep this quilt for myself.  I have enough material to make another.

On this quilt, I had planned to lay out the blocks in vertical straight rows with sashing.  I could have dealt with the wonkiness better this way.  As such, I put a triangle in each of the corners to straighten out the block.  Here's what it looks like on my wall...actually, the photo does not make it look so bad!


But the zoom knows....


 Gasp!  The quilt police would certainly issue a citation if not haul me in!  Now, this quilt top would be perfectly beautiful and serviceable.  But my goal is to be a little more in the neighborhood.  There just wasn't any fix available to me at this point.  While the above is out of whack, further down the road is not.

Had I made an earlier commitment to this layout, I would have put full triangles vs the corner 1/2 triangles.  One thing about undertaking new things, you don't know what you don't know! Each of the blocks are fun and unique.  True, some of the patterns hare a wee bit out, but nothing that none but the pickiest would notice.  I would use my dental floss method again. Further, as it is a textile, you cannot control the printing. For any who have made home decor stuff, half the trouble is straightening out the print so that your curtains lay straight on grain.  A carpenter's square still is a tool I have near my machine.

When I made this, I took my yardage and tore in it half lengthwise. So I have enough to make another pass, and I think that I will.  Also as I have a hexagon rule now, I can more effectively trim my blocks. 

Here's a closeup of some of my blocks--they are magical, whimsical and surprising...no one block is the same as any other. I cannot even choose a favorite.


Skill Building: Hexagons


I had some leftover fabric from a quilt back.  I decided to use this strip to make hexagons in the dark gray fabric.  I paired with white.

There are surprisingly few videos on how to piece Y seams together. Below is a close up of my Y seams which is not too shabby.

Now I had lots of practice in trying to do LeMoyne Stars the old fashioned set-in way. These 120 degree angles are far more forgiving than the 90 degree angles.

You must mark your hexagon's points at 1/4".  If you have an equilateral (60 degree) ruler with holes on the points, you will have a perfect tool for a perfect dot for a perfect DO NOT CROSS point on your block. I used a Pima marker and marked a dot.  Pima markers do not bleed like Sharpies (they are both permanent but when you put a Sharpie on the fabric the dot spreads more than a Pima marker.


The Marti Michel Corner Trimmer has these markings.  Some Hexagon Rulers have them, some do not.  I think that they are essential to quickly and accurately marking your hexagons.


The very best video on sewing Y seams is this one by Sarah Payne.  You can find it below:


I will tell you why her video is the best.  Most every other video has the viewer 

  1. Marking the entire seam allowance on all blocks; or
  2. Marking the points on each + sticking a pin through the matching points.

My quibble?  All you need to do is mark 1 block.  Because you are lining up edges together exactly, the 1/4" point on your marked block is going to be exactly as the one behind it.  Marking both and putting pins through the dots and more pins...well that is much more work without any quality differential in your output.

Of course as as serial glue baster, I match my edges and put a dab of glue along the edge so nothing shifts.  

Therefore....if you mark your seam allowance with dots, AND never go past the dot, AND line your edges together perfectly (and of course cut perfectly),  you will not have any puckers.

The hardest part about any of this is pressing the seams.  In addition to Sarah's video above, I found this great video by Emily Breclaw.  She demonstrates the spinned seams of 2 half hexagons (which I wrote about here ) as well has pressing and spinning hexagon seams.


My next skill builder is to cut the half diamonds and inset them..  I can see this as being a cute baby quilt pattern using more colorful fabric in place of the gray.  Though I have to say, I'm a big fan of gray and white.

My hexagons were 6.5" cut which made them easy to handle, and the piece built quite quickly.


Hot Pepper Relish


 I have an "ahem" locally famous (among family and friends) hot pepper relish.  I've not made it since 2017--quite a hiatus.  I recently visited some friends and I was gifted a 12 pack of half pint jars with a lovely "I love your hot pepper relish, and I want to give you some jars not take full ones from you."

I, too, have missed this relish.. I put it on everything sandwiches and hot dogs as well as tuna, egg and potato salad.  This past weekend I bought 15 lbs of jalapenos and and some red onions.  We picked all the sweet and hot peppers ready in the garden, and I went to work.

Many years ago, I used to handcut the hot peppers into rings.  It is tedious--and I recall that I forgot to wear gloves.  The capsicum was embedded in the skin of my hands and burned.  Plus, my hands, back and legs were tired from standing and chopping for hours on end.

I later started grinding them in my Kitchen Aid grinder attachment.  A tedious and long process.  However, when I started processing my dogs' food and purchased a #22 Weston grinder, grinding peppers became a game changer.  I can ground 15 lbs of pepper in about 10 minutes!  Takes longer to set the grinder up than grind the peppers.

I simply chop off the tops.  For about 1/2 the peppers, I slice them in half lenghthwise and use an apple corer to slice out the wall and seeds holding it in line with the pepper and scooping from end to end.  It is the best tool for this.  I use one gloved hand to handle the cut pepper leaving my right and free to use the knife.

For the balance, I keep the seeds and the wall and that creates more heat.  I allow the peppers to drain so that they are not so soupy.  Below is the University of Georgia's Recipe which I follow.  You can get their guide by going here.  I also add juniper and allspice berries (just a few per batch).  I am a stickler for relationships of base to additives.  Measure your pepper/onion base and your vinegar (5% acidity, do not pick up cleaning vinegar which is lower) and sugar accurately.  

Some tips.

  • Wash your jars and all the stuff that you plan to use in hot soapy water. 
    • I wash my jars well, rinse and do a FINAL RINSE in a large pot with hot water and some vinegar. Vinegar removes soap residue.  It may be extra work, but I do it so I have hot peppers not Dawn peppers.
  • Keep your jars warm so they are not temperature shocked when you add your hot liquid. 
    • I use have a wide, low  round pan that I put water in on two burners (your range real estate will dictate what you can do).  I put my jars upside down.  I place my lids in stainless steel colander in the water.  I have two stainless steel jar funnels...one for wide mouth and one for narrower.  The cheap plastic are just that.  If you can get the stainless; they are inexpensive and last forever.  I use 
  • Use 2 jar handlers.  You really need two jar handlers if your jars are upside down in hot water and you have to grab them and turn them.  Small expense for having tools that will keep you from breaking jars and burning your fingers.
  • Start your water bath right away and use a lid.  You must have enough water to cover your jars the recommended amount.  I couldn't use my canning rack because I couldn't find the @!%$#^@#$%&& pot it went in.  I did have the diffuser that sits on the bottom.  You have to put your jars on something besides the bottom of your pan.
  • Fill your jars as noted in your recipe and ensure that you take a non metal object (plastic knife, chopstick) to release any air bubbles.
  • Do you have a digital snakey-probed thermomenter?  Use it. (And for heaven sake get one...they will ensure that you never overcook expensive meat).
    •  Put it in your water bath so that you can monitor when your water returns to 212...full boil v. a simmer boil, after you have added your jars which drop the temp. Processing times are based on full boil.  Your  you can begin your timer (and it has one)  once the temp reads 212 (yes I cheat a degree and will accept 211).  Note, too that these probes sometimes have to be calibrated.
    • Process timings:  make sure that you know your altitude.  There are 3 gradations of timing to account for <1000, 1000-2000 and >2000.  You want to be precise here as a matter of safety--and again....begin timing once it reaches full boil.
  • Do not overtighten jars going into your bath.  Once they cool, you will find they have loosened.  come people store without the ring band.  I leave it on, and finger tighten again.  Not too much or you will warp the lid and break the seal.   Make sure all your lids have sealed.
  • Put your jars on a surface that has a towel on it to prevent temperature shocks to your jar (and to absorb the water).

How long does it last in a jar?  Convention is that it should be consumed in a year.  I've had it 2 years out without any diminished quality that I could find.  

 Because I'm anal about some things, I have a label maker.  I label my batch with the date made and what it is.

I don't can much.  Hot pepper relish is really the only thing that I make.  I don't can't tomatoes.  The ones that I get from the store are better quality than most canned versions to my taste.  I'd rather have Italian tomatoes than the ones from my garden!  Those belong on a BLT!

 I personally vouch for the recipe below.  It is the only one that I use.  Note, too, that you can get the best FREE publication from the National Center of Home Food Preparation here.  Also you can check with your local extension office...and many of the ag colleges (like UGA) have some great recipes.

Final note:  I have made this recipe adhering to the ratios including peaches, ground green tomatoes.  I have also just used a gardener's mix of hot/sweet peppers v. the ratios you see here.  Hot peppers and sweet peppers ratio does not matter...they both have the same PH profile and do not affect the sugar/vinegar amounts.  Even though tomatoes are acidic, I still use the same ratios for the non acidic peppers/onions.


Print Recipe

UGA Sweet hot Peppers - Master Recipe

Serves: 1

Ingredients

  • 5 cups ground peppers 3-4 lbs before grind
  • 5 cups ground jalapeno peppers 3-4 lbs before grind
  • 1.5 cups ground onion
  • 2.5 cups distilled white vinegar
  • 2 cups sugar
  • 4 tsp pickling salt
  • 4 tsp mustard seed

Directions

  1. Procedure:
  2. 1. Wash and rinse canning jars; keep hot until ready to fill. Prepare lids and ring bands
  3. according to manufacturer’s directions.
  4. 2. Rinse bell peppers well; trim to remove stems and seeds. Slice stem end from jalapeño
  5. peppers; grind remaining jalapeño peppers with seeds. Peel, rinse, and trim onions. Cut
  6. peppers and onions into large pieces. Coarsely grind peppers and onions (see Notes).
  7. 3. Measure 5 cups of the ground bell peppers with their juice, 5 cups of the ground
  8. jalapeño peppers with their juice, and 1½ cups of the ground onion, also including juice.
  9. Combine the measured peppers and onions with the remaining ingredients into a large
  10. stockpot. Bring the mixture to a boil over high heat. Reduce heat and cook at a low boil
  11. for 30 minutes, stirring often to prevent scorching.
  12. 4. Fill the hot relish into prepared hot pint jars, leaving ½-inch headspace. If needed,
  13. remove air bubbles and adjust headspace to ½-inch. Wipe rims of jars with a dampened,
  14. clean paper towel. Adjust lids and bands.
  15. 5. At altitudes under 1,000 feet, process in a boiling water canner for 10 minutes. At
  16. altitudes of 1,000 feet and above, process according to recommendations in Table 1, on
  17. page 16.
  18. Notes: For recipe development, peppers and onions were ground using a stand mixer
  19. grinder attachment with the coarse blade.
  20. This is a fairly hot pepper relish. It would be good stirred into cooked greens or beans, or
  21. served with cream cheese on crackers. In order to adjust the hot pepper intensity of the
  22. finished product, the proportion of sweet to hot peppers may be adjusted according to taste
  23. and the variety of hot pepper provided that the total amount of measured ground pepper is
  24. not altered. In other words, with all other ingredients measured as specified in the recipe,
  25. there should be no more than 10 cups of ground peppers.


Powered by
Plan To Eat

Binding Your Quilt: Observations

 There are lots of videos about binding your quilt.  As with most "quilty" (and any other) hings, there are practices and best practices and preferences.  I'm still a "newbie".  I began my first quilt two years ago.  Oh, and I finished it...but it was an eye opening experience.  Though not so disastrous that I could not fix it and gift it, I realized that I had a long way to go.

Quilting is a manual skill.  Like any manual skill, one has to practice, and put in the work and time to build mastery.  I've come a long way in my skills.  And along the way I have learned that there are several different ways to accomplish the same thing--some ways are better than others.

Sharon Schamber has perhaps the best video on binding.  I'm not here to give binding lessons, but rather some binding observations:

  • Binding Strips:  
    • Size:  Many say 2.5" others say 2.25".  If you do not have a border (that is sewn at 1/4" on your blocks thus preserving the points) using 2.5" will cause you to lose your points.
      • Kimberly Jolly puts a little more of the batting into her binding by cutting about 1/4 inch beyond the quilt top.
    • Application:  Many say attach to front an hand sew to back.  No question that method provides the neatest finish.  Some do same and stitch in the ditch on the front hoping to catch to back.  Others attach to the back and bring to the front and bind the edge down. I use this method.  I like to know that it is stitched securely, and I'm never going to hand bind.
    • The real skill is having the binding be even all the way around.  I'm still working on that.
    • Sewing the binding strips together:  Get a Folded Corner Ruler. Krista Moser has a great demonstration that solidifies the concept that I'm outlining here.   It is compact and helps with initial joins by removing the unused bulk.  Stack your strips right sides up and cut.  The Folded Corner ruler is designed to have the 1/4 inch seam allowance run through your diagonal (e.g. it is the stitch line).  You can use your other rulers, just ensure the 1/4 line is running through the corner.  Because the folded corner ruler is smaller than regular rulers, it really helps with the final join.  Putting strips perpendicular and futzing about with alignment interferes with your enjoyment, productivity, and outcomes.
    • Final Join:  I recommend that you practice this on a test piece.  Once you get it, this method will always stick in your mind. You don't want to make a mistake and have no more binding or have to re-piece something in.
💣💣💣 I'm embarrassed to say how the final join was nearly impossible for me to see in my head. jI was new.  I watched videos where every instructor was showing a different way from a different angle, and I'm going HuH?
 
If you follow these 3 steps, you will never have another final-failed join issues, and your joins will be professional looking.  ( I will inserted some pictures below at some point). The folded pocket join is not a good look in my view.  It takes no more work or fuss to do it the right way.
      • Leave enough tail on the beginning and end to have a 10 inch overlap to give you some breathing room.  
        • Ensure that both ends are squared off (e.g. no miter).  That will help you when you measure the overlap.
      • Do not be afraid to cut your strips.  The length of of your cut is simple
        • It is ESSENTIAL that one end of your binding overlaps the other end by the opened width of your binding strip.  If you have a 2.5" strip the overlap (over a straight cut end of the other side) is 2.5".  Accordingly a 2.25" strip has an overlap of 2.25".  Yes, it is that easy.
          • Tip:  Cut a wee bit on the inside, so that your cut is a wee bit shorter.  That means that the join will be a little shorter than the exact measure and your biding will lie flatter as it will have a WEE bit more tension.  
          • Emphasis on "WEE".  IF your binding is longer, you may end up with flaccid binding and a tuck/pucker (these sound like bad health conditions).  You want it smooth and taught.  Wee taught. Not real taught. 
          • 💡💡 If you have trouble cooking with scant, and pinch and such, your wee bit should less than 1/4". Because you are using the folded corner, your seam line should be exactly 1/4".  
      • Use your folded corner tool to miter the cut ends JUST AS YOU WOULD when you are connecting your binding strips. However, it can be disorienting at this point.  Here are some tips to stay oriented correctly for the spatially/directionally challenged (me!)
        • Quilt should be closest to you, and binding edge furthest away from you. 
          • orienting this way ensures that left and right mean only ONE thing.
        • Open up the left and the right binding strips  that you have expertly measured and cut.  Iron them out to remove the binding crease. Ironing helps you get a perfect miter.
        • For the right side, make the binding do a hard right turn.  If you grab it with your right hand, you would turn your hand to the right (clockwise). Lay it flat. The cut end of that strip needs to be right side up and facing right.  There should be a goosenecked bend in it. If you twist it here (wrong way, wrong side), you will be very sorry!
        •  The left strip is easy.  It has no turns, and is sitting there face up and pointing right.
        • Stack the left strip, right side up on top of the right strip (hard right turned, and right side up).  Line your ends perfectly because you have perfectly measured and wee bit trimmed further.
        • Cut your miter with your Folded Corner Ruler. The miter should be going from bottom right to top left. If it is going any other way...tears will follow.
        • Join your strips by putting the right strip on top of the left strip (right sides together) and sewing just as you would when joining binding strips.  
          • Make sure that you don't have anything twisted. (I have experience with this caution!). If you grab the right end and flip it directly over (rotate your wrist to the left and lay it right side atop the left). You might want to use a basting stitch  or glue baste until you perfect your muscle and eye memory on this technique.
        • Re-press the crease in your binding and make sure that it lies flat and taught (not tight) on your quilt.
          • if not, you will get a pleat in your binding.
        • Complete your stitching.
        • ADMIRE YOUR BEAUTIFUL FINISH!!!
 I promise you that once you do this a couple of times, the ending will be demystified, your joins will be beautiful. I am a binding snob.  I pay NO mind to the folded edge finish.  All the time that you've spent on your quilting...learning all of the intricacies of each step and you are going to fold the edge over.  NOPE!

Stitching to the other side.  Once you have made your first pass on attaching the binding to whichever side of the quilt you want to start with, you need to stitch it down.  Here are some considerations:

  • If you are hand stitching, you will never have an edge that does not get sewn down.  God Bless You.  I believe this is the BEST finish, but I'm NEVER going to do it.
  • If you are machine stitching:
    • Binding attached to front, stitched to back through stitch in the ditch on the front
      • For this to be successful, the back edge must cover the original stitch line.  You can use binder clips, glue, or fusible web to secure that coverage.  Any wobble in your stitching will cause a missed edge.  I've not seen any finishes that I would find acceptable (and I'm not that picky).
    • My preferred method: Binding attached to the back, brought forward to the front.  I feel this method offers the greatest accuracy.  I use a mirrored ladder stitch with matching thread to the binding or use the seamguide foot sole plate on my walking foot. If the stitched line lines up well with the edge, your back will look fine. Again, if you cannot see it, you cannot manage it. Make sure that you use discrete bobbin thread for the back of your quilt.
 
💡Tip--If you have a centerline guide sole for your walking foot, use it!  It is a great guide--not only for perfect edge stitching on your binding but also for stitch in the ditch on your quilt top.You may have one for your sewing machine.  I don't have an even feed system, so I need my walking foot. With an even feed, I don't think it matters and regular machine foot may work.  I have also seen some use a lapseam foot.

While I no longer fear binding, I still have more work to do to perfect my technique to have perfect, even binding and stitching front and back.


Here are some Pics

 After you have overlappped your binding, cut it a wee bit short, and have two 90 degree cuts (square ends), you are ready to miter. 

Below is the right hand side of the binding.   It is opened up, and I pressed the crease out of it.


Here is the hard right turn.  This is the position that it must be in when you miter.  Remember your quilt is closest to you.  Your binding is away from you.

Now lay your opened up left strip, right side up, on top of the right hand side.  Here they are stacked up on my cutting board.  I put a pin in it to hold it for the camera.
 

Okay, now I'm going to show you how to do a mitered cut.  Don't worry.  It will be perfect so long as you measured correctly, and you have oriented your pieces.  I've shown you how to do that. I normally use my folded corner ruler, but I wanted to show you how you can use a triangle ruler.

Notice the following.  The purpose of mitering is to have the seam allowance accounted for.  Accordingly, the 1/4" line must be going through the corner.  YOu will have a 1/4" jog above the bottom, and a 1/4" jog at the top (see the dashed yellow line and the side of the ruler.

Now let's glue baste our seam.  I've put some glue drops on the left mitered binding end.

Now grab the right end, and rotate COUNTERCLOCKWISE which will land the mitered side, right sides together perfectly aligned with the left side above.  Heat set with your iron.  You could also pin, but I don't like pins, and this way is more secure. The joined edges are below (glued).


Sew a perfect 1/4"

I attach to the back and fold over to the front.  I do a perfect(ish) edge stitch with the help of my edgestitch sole plate for my walking foot shown here.Take your time...one stitch at a time as if you were hand sewing but making perfect hand speed stitches with your machine.


You will NEVER  have to tuck and sew again. 

About the seam treatment.  My preference is to sew to one side.  It does not make it bulky and stays strong. (I do with all binder joins).


One Block Wonder III | Spin the Seam and Chain Piecing Strategies

Spin the Seam

 In general, I do not press any seams open.  Because of am a serial glue baster, shunning pins whenever possible, pressing seams open is just not possible.  I like to glue baste because it increases my accuracy, and it stabilizes bias edges.  I know that some believe that seams pressed open weakens them, I have no evidential matter for that.  Given that quilts have so much quilting, I would believe that it is reasonable to assume that pressed open seams will not receive undue strain from use. Further, experienced proponents of open seams have tons of experience and attest that these seams do not fail.

But because of my glue basting proclivities, such is not an option for me.  I wanted to show you what the back of my OBW quilt block looked like


It is nice and neat, and it lays perfectly flat.  

Cutting and Chain Piecing Strategies:

As I noted in a this post when you spin your seams, you must spin in the same direction.  To achieve consistency, the seam must be spun relative to the center.  Edyta Sitar spins ("pushes") her eight pointed stars to the left (with center point facing you).  I've used that method and have had no problems with things lying flat.

A word about triangle rulers:  It's worth noting that some 60 degree triangle rulers have flat tops and some have pointy tops.  Make sure that you match your pattern to the ruler.  I have both a Clearview 10" 60 degree and a Creative Grids 60 degree diamond ruler.  The Clearview has pointy top and the CG has a flat top.  As a matter of math, if you are cutting strips and using a pointy tipped, your strip set will be 1/4" wider than a strip set using a flat tip which as the 1/4" tip clipped away.

💡  I (strongly) recommend that you achieve a flat tip for your triangles so that you always have a north star that tells you where the tip of your piece is. You can achieve this through your ruler or by using a trimmer.  I have a Marti Michell 60 degree trimmer...it does an excellent job trimming your points as well as it has a hole so that you can mark the 1/4" inside for Y seams.  I simply took my pointed stack and put the trimmer on it and cut all 6 at the same time.

Using a helper ruler when cutting.  I'm not a big fan of spinning fabric--particularly any fabric that takes 1/2 a lifetime to line up such as the one block wonders.  I use a helper ruler that butts up against the triangle ruler to make the left hand cut.  (Butt the helper ruler on the left, and then push the master ruler to the right and make the cut.) 

Mark the Centers: If you are using a flat tipped ruler, you always know which is the straight of grain edge and which is the center because it is flat!  If you are using a pointy tipped ruler, well, each point looks the same as the other.  Until you you pull and meet resistance on the long end do you find the bias.  I use a fine pointed Sharpie/Pima pen to put a small has mark on the centers...more later. (I've since got my Marti Michell 60 degree point trimmer...it is great.)

Pieces of 6: As you cut, put a small clip on the straight of grain side or toward the left or right edge close to the top (center point). This will ensure that you have the right orientation and avoid bias on your outside edges.You will develop muscle and eye memory using this guide.  Do not underestimate the power of either in your productivity as well as avoiding the unpleasantness of ripping out seams.

Chain Piecing: There are lots of pieces to sew together.  I'll share with you how I accomplished this task.  At first, I laid out each block.  I later nixed that step as my process matured.I was able to work very fast and accurately using this method.

  • Grab your Pieces of 6. Before you remove the clip, mark the top piece with a hash mark on the center point.
  • Work with 3 pairs.  You will be working with 3 pairs of fabric.  The first 2 pairs you will be sewing together.  The 3rd pair you will be splitting up and sewing the right side (center facing you) of Pair 1 and Pair 2.
    • Match the first pair (top two pieces, right sides together with the marked center point on top). Lay down with center down.
    • Make a mark on the 3rd piece (start of 2nd pair)to mark the center point.  Match it right sides together with piece 4. Lay down with center down. (you can overlap stack).
    • Mark the center point on piece 5 and leave it paired with its mate.  Each of these pieces will be sewn to Pair 1 and Pair 2 later.  
      • Place the 3rd pair aside in an order that makes sense to you.  As long as the pairs are together, you can overlap them if you are short on space. I put these in a tray.
  • Match the seams of the center line.  Secure.  Sew.  You can pin.  I glue baste each  seam and overlap stack them.  I then zip them through the sewing machine.   
    • As you chain piece, your order of Pair 1 and Pair 2  Block 1 is preserved.  The next Pair 1 and Pair 2 is for Block 2.  See how fast this goes?  You are chain piecing so ALL of the pairs stay nicely together.
  • Attaching Piece 5 to Pair 1 and Piece 6 to Pair 2:  Once you have sewn the pairs together. 
    • Place them on your ironing surface.   Set the seam.  With the center facing you, (you have one piece on each pair marked, so you know which it is!), push the seam to the left.  (You could also push to the right, but you must maintain the same directional push!).  You could also choose to press open...but I'm advocating pushing and spinning.
    • Find Pair 3 from your set asides.  They should be in the same order as your Pairs 1 & 2.   Because I push left, I am adding my pieces to the right side (center toward me) as I have the dog ear to perfectly match. I mark the center point for the piece added (you should only have to do  this for 1 as you've marked the other.) Again, I'm glue basting.
    • Sew 3rd triangle and create half block... The beauty of glue basting is that nothing is going to budge, and there are no pins to stick to other pieces or you.
  • Press your Halves.  Once you have sewn this final pair to Pair 1 and Pair 1, you now have 2 halves.  
    • Set seam on your halves and then push to the direction (or open) you have chosen.
  • Joining your halves.  
    • Line up the center seams the same way that you would do so on pinwheels or other complex blocks.  I push the seam aside to find the V join on the back of the top piece and put a pin through it.  I then push the pin through the bottom half  (RST) seam convergence.  I then push straight into my ironing surface (I have a 1/2" wool mat that I have upholstered with linen cloth..so I can easily pin to it).  It makes a nice pivot to line up the outer edges. I then put glue on either side of the join to the end.  
    • Remove the the pin and press block together.  You should have a perfect join and you can stack these aside for final sewing.
  • Final center join.  
    • Sew your blocks together.   
    • Set Seam
    • Turn over and spin the seam
      • Unpick the 2-3 stitches on your last join. (Often just a twist will work)
      • Twist the seam.
      • Spin the final seams in the direction you have chosen for your halves. It should look like the picture above.
      • Press. I like to spritz with starch, cover with pressing mat and do a final press.

Slap it up on your design wall.  Here are all of my beautiful blocks on my design wall.


Each are so wonderfully unique.  Yes, I'm about 10 years behind what was a trend.  These blocks were cut from 3.75"  If you were to look carefully at some blocks, you will see that there are some minor deviations in the matching/cutting. None that any would notice.