Showing posts with label 2021 quilts made. Show all posts

Prairie Quilt Finished

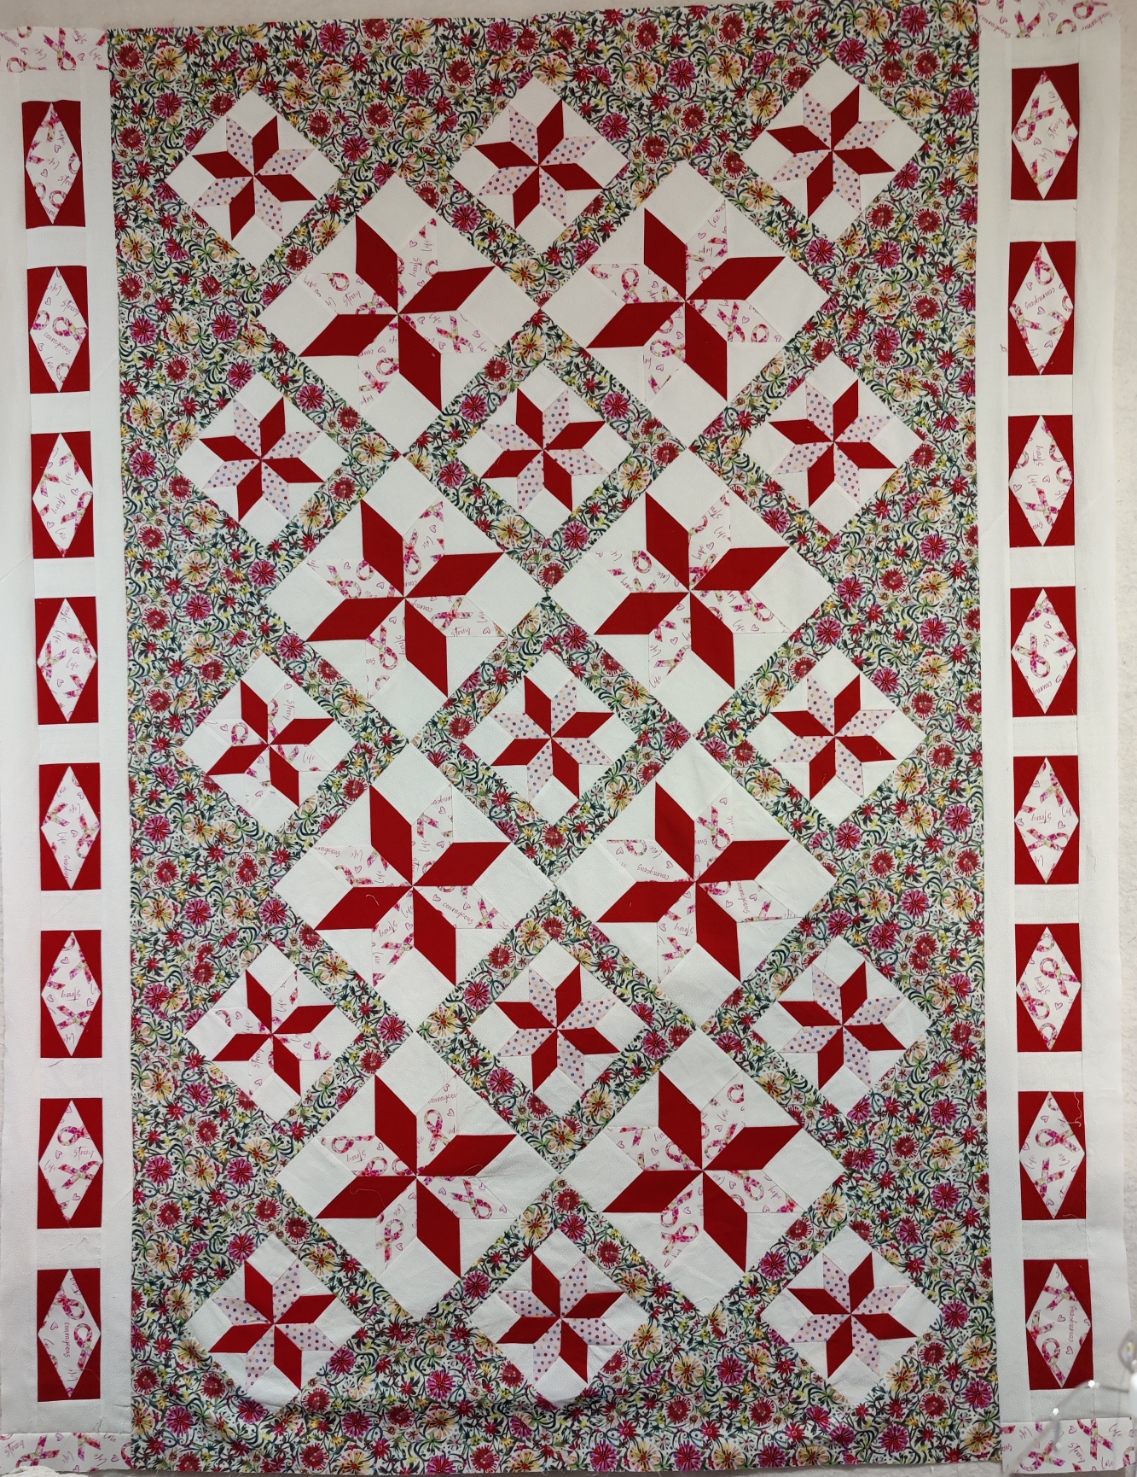
 Over the weekend I finished the Prairie Quilt, a free pattern my material girl.  It is a 72" square quilt. I simply stitched in the ditch and some additional straight line quilting.  I was tired a sore from maneuvering the quilt through my domestic sewing machine.

The binding that I chose and premade I reserved.  It was an off white with the quilt color in a line design.  but it was too washed out.  Thankfully I found a nice maroony-red which was perfect.  But extra work and time. I cut my strips using my Stripology ruler and used my CG Folded Corner ruler to trim and sew the mitered ends together.  I use 2.25" strips.

I sew to the back of the quilt and then roll forward to the front.  This method requires extra care with the mitered corners.  The mitered corners typically always look great on the original attachment side (e.g. the backside after you flip).  My corners ended up perfect.  (For a change--seems like one of the four arm wrestles me!).

Once I attached the binding to the back and ironed the seam and binding flat, I took care bringing it over.  I used fusible web (1/4" to get the binding to lay flat on the front. Securing in the fashion assures that the binding stays put as it is securely fitted prior to a needle even piercing the binding. Using the binder attachment with the seam guide scooted my needle over 3 clicks.  The seam guide followed perfectly on the binding flipped edge, and I had a perfect edge stitch.  I slowed my machine down.  I have found it too easy for the work to shift and end up with NO stitch on the binding (in the ditch).  I used my stilletto to guide the work all the way into the needle.  

I put a sunny batik on the back of the quilt.  I was really happy how it turned out.  I will wash it and gift it to my step mom.


Lemoyne Star On Point


 Here's where I am so far in my throw quilt.  I elected to set my LeMoyne Star blocks on point in the beautiful "Alfie" fabric by Este MaCleod.  It is long enough, but not wide enough.  The frame around the smaller stars was a perfect way to  pair these smaller stars (all of these were practice blocks) with the larger.  In fact, it makes them look as if they are floating. 

I need to put a border on two sides as I want to get it to 50".  In my "organic" (read chaotic) process of putting this quilt together, I need to deliberate on it.

And here it is. 


I used my Deb Tucker Diamond Rects to make 3x6 diamond rects and put a 1.5" finished border around them to get more width on the quilt. I used the rest of my ribbon fabric.  Part of me thinks I should have floated the diamonds in the backround fabric...but I was feeling as if the background was too much.

I have 3 more large stars that I will put on the back of the quilt.  I think that I'll use the same floral on the back with the 3 stars pieced in.  I think that I'll put them vertically to create a panel on the left of the quilt.  That will help with the piecing of the back as the piece is about 52" wide.

I did not figure my spacers on the diamond correctly... so I had to put filler on either end (pulled the center of the strip to center of quilt top and then filled in the rest.

Overall a good effort; one that I will be proud to gift.  It will use all of my stars--and most of my stars look quite good, though there are a few blocks where the points were clipped. It was a good creative process to go through as well as an important skill builder.


Quilt Finishes; Lost Quilts; Quilt Basting

Quilt Finishes:  The long July 4 holiday provided an opportunity to get some stuff done.  I finished two baby quilts (basting, quilting, binding).  I don't do any fancy quilting on them--they are utility quilts.  Accordingly, I take pains in piecing and binding, but for quilting I follow the seam lines or do wavy quilting.  I also basted the top of my large Hunter's Star quilt to the batting, and I began piecing the back.  I had several orphan blocks from the Hunter's Star as well as some practice blocks for LeMoyne Star (the non-cheater way) that I could nicely fit in a a couple of banded rows on the back.

 Here's an old quilt top that I paired with adorable elephant print for backing.  It is hard to beat the quick assembly of an alternating patch for baby quilts. You've also seen me substitute a 4 patch for the solid square which makes it a little less plain.  My quilting was simply stitch in the ditch which makes for a fast finish.  I don't feel apologetic for plainness.  To make a plain quilt is still an investment of time and money.  Plus plain quilts such as this really show off cute juvenile fabrics. 


I have a portable monitor and a fire stick.  I shuttle the monitor between the kitchen and my sewing area.  I have old PC speaker systems that sound quite nice in both places.  A cheap and efficacious way to enjoy watching stuff while working.  It takes a bit of the drudgery out of repetitive tasks.  Yes, I could use that time for mindful mediation....but most times I don't!

Lost Quilt Top:  My Hunter's Star baby quilt was supposed to be in my quilt finishes but I cannot find it.  Good reason to tidy up! (It has since been found; quilted; needs to be trimmed and bound)

Basting:  To baste my quilts, I use fusible webbing.  I have both Stitch Witchery (on the bolt) and MistyFuse.  I buy both in bulk...but it is an investment--both in good results and less frustration.  I have a large 24x48" ironing surface that I use to fuse.  I was able to do my 60 x 72 quilt fairly easily, and baby quilts are a breeze.

Fusible web comes in many package sizes.  I buy the bolt--it is something that I use in quantity, so I buy in quantity to get the best price that I can. Bolt widths for both Stitch Witchery and Mistyfuse are 20".  I found that in bulk, Stitch Witchery (is about 10% cheaper than Misty Fuse in bulk.  I will pull off a length from the bolt about 18".  I then keep folding the product until I have a tightish roll and cut in 1/2-1" sections.  (Yes, you can buy this in the size already, but you pay dearly for that convenience.) 

I place these in a container and then take them to my ironing station.  I unroll a length and place it on the batting in a continuous line, spaced about 2-3 inches apart vertically.  You could also make squares and treat it as a "pin".  You could also fuse the whole thing...but that gets expensive.

Using the highest heat setting and steam ensures good fusion in good time. And while you do this, you can enjoy a beverage and a binge watch to make the time go by.  Or, you could engage in mindfulness meditation. Or...you have plenty of time to do both, because basting no matter which method use is TIME CONSUMING.

💡  It is important not to distort you seam lines.  Lay it straight.  Smooth it out.  I do not find that this smoothing process adversely affects  Press.  I work from the middle out. The fusible web keeps everything secure. 


The Leftovers Quilt-Finished


Here are the front and back of my leftovers quilt.  Yes, I wished I had put the pink bee fabric in the top left corner block...but I had already adhered the batting to the top.  No baby will notice.  And I used up some blocks and fabric from the collection on the pieced back.

I quilted it simply using my quilting running stitch on my Bernina. I learned recently that to achieve the intended look, you are supposed to use monofilament thread in the top and mess with tension.  I just used it like plain ole stitching, and I was fine with it. I used light gray thread on the top and pink rayon on the back.  It turned out very cute, and I was able to use up MOST of the leftover fabric in this line--this is the third quilt.

The pink fabric on the back is some Dear Stella fabric that I bought at Hancock's when it was $3.99 a yard.  I get big yardage when I see sales like that to use as quilt backs and binding. COVID/Post Covid has meant reduce values to be found. 

I made the pinwheels using Lee Henrich's Perfect HST.  Because these are paper pieced, they turn out quite well so long as you sew them together right.  I have one that looks like I was cross eyed.

I was able to use the last of my pink and gray bee fabric for the binding.  I cut my binding at 2 1/4 inches rather than 2 1/2".  I think that it worked better with seam allowances.  There are NOT perfect points on my diamond recs on the sides, but I'm fine with that. 


The binding was sewn onto the back and then brought forward to the front.  You can see how nice it looks in the picture above. I used fusible web to iron and tack down the binding to the front.  That keeps everything in place.  I know many use binding clips..and I have an use those.  But as this binding was narrower, I wanted to have in more permanently place.  My Appliquick tool is great for handling the fusible near the iron.

I like this stitch. It's the method I prefer to use because I'm not going to hand stitch binding. I'm not making show or heirloom quilts.  Rather quilts that are rugged and can withstand lots of washing.  I used a reverse blanket stitch with matching thread.  I really like the way that it lays down flat which I think makes a clean and attractive finish.  Yes I was a slug and used a decorative thread for both the quilting and the binding.


The Leftovers: Quilt


Part of keeping busy and trying to process the recent loss of our beloved Dexter, I was going through my "leftovers".  I had this adorable fabric that from Tuesday Morning that I've made several quilts with.  I decided to do an organic quilt:  Make pieces and see where it takes me.

I made 2" finished half squares triangles that I fashioned into pinwheels that finish at 4".  I then cut squares  *(4.5C, 4"F) of print fabric and white fabric an arranged as the center.

I kept the blocks on my design wall until I could figure out how to sash the blocks.  I still had my mushroom girl fabric; I wanted to use as much as I could.  I decided to make diamond rectangles (2.5x4.5/2x4) with a cornerstone (2.5C/2.0F).  I'm very happy with how it turned out.  

I should have put the pink square in R1C1 but I was too lazy to pull it out--I'll atribute to "one wonky block"!  This quilt finishes at 45"x45".  I'm piecing the back to use the balance of the fabric, and I will bind with the pink and grey bee fabric.

I really like the pink, grey and red colors together.  

I use Lee Henrich's Perfect HST PDF to do my HST.  I found it very therapeutic to immerse myself in this project.  Both my husband and I are having a hard time processing our grief. We've lost alot of beloved dogs, but this has been the hardest...all the harder as we have no waggin tales.


My Hunter's Star Quilt Top

 Below is my Hunter's Star Quilt Top (truncated).  I just finished piecing all of the blocks together.  Much more to do.

I made this from white background, blue and green batik fabrics.  The batiks are from Leah Day's collection that I bought from Quilty for $5 per 2 yard bundle.  I bought 10 bundles, but I wished I had bought more.  Hard to find fabric at a such a price.  This quilt used quite a bit of each color.  I will bind it in these batiks, and I think that I'll be done with the fabric.

The full size of the quilt is 5 columns wide (5 @ 12" FB) and 6 rows each (6@12) or 60" x 72"

Hunter's Star 6" Finished Blocks

You can click on the above and open in a new tab to view my handiwork.  Is every star perfect...no.  There are designs on the Batiks that are lost in their totality, but adds, (to my eye anyway) lots of visual interest.  I plant to gift this to a one of my oldest friends for use as a porch quilt.  I may add a coping border so I don't lose any poinits.  Overall, I think that it went together very well.  It is, though, alot of work.  Nevertheless, I found the cutting an piecing very enjoyable.   Please see my blog posts on my approach to this quilt.  I find this block captivating.  My production method (adopted from others and adapted to my tools) suited me, and yielded a high quality result.


Creative Grids Diamond Dimensions Rulers + Hunter's Star --Part 1
 
Hunter's Star: Part II


Hunter's Star: Part II

 You can see my lengthy post on my approaching the Hunter's Star for the first time here.  Here's the result from using 6" quarter blocks to make 12" blocks for this 36" x 36" baby quilt.  While this started as practice, it turned out so well, that I'm not ashamed to give it away.


Hunter's Star Baby Quilt

I started with the turquoise and white, but I did not have enough fabric to make more than 5 complete blocks.  I had some other fabric (that came in a mystery print box from Hancock's of Paducah), that picked up the colors.  I used that as fill in block.  I'll make a baby quilt from this. This finished at 36" x 36".

For those who LOVE stars such as the Lemoyne, the Hunter's Star may be more approachable. The construction methods are VERY different, but you end up with a beautiful eight pointed star inside of a block.

In my prior post, Mary provides a scrappy version, and I think that it looks lovely. 

I see several posting on how to make this using half square triangles. By doing so, you break up prints.  With Deb Tucker's construction method, there is no need to use cheater methods to avoid dealing with sewing diamonds to trapezoids.  Sewing the trapezoid to a diamond strip is so easy and accurate.  I'm not great quilter, but I feel that my results for first time speaks to the ease and efficacy of the method.


Play Quilt Using Jack in the Box, Colorado Beauty and Square in Square.

 One of my dearest friends has a grandaughter (son's daughter) who lives in South Korea.  Her son married a beautiful South Korean Native.  After living here for some time, they elected to return to Nomi's birth place.  I'm sure her parents are enjoying being with their grandaughter who they did not get to see for some time prior to her returning. 

Jane turns five this year.  I was not quilting when she was born.  However, I wanted to make a 'play quilt'.  It is 46" x 46".  It is large I enough to have a tea party or cuddle while reading a book.  Putting some borders on the quilt could easily add to the size.

I acquired the fabric on close out.  It was part of the "Save Yourself" collection by  Dear Stella. (My preference is to find fabric on discount and then figure out what to do with it! Here's the back of the quilt.The pattern evolved around made blocks plus material on hand and trying to hit at an objective of incorporating it all into a finished quilt.  In this case,  I wanted to use the Jack in the Box blocks that I couldn't quite make work in a front of the quilt design.  The dragon and castle fabric was directional...I didn't have enough so I pieced it in.  My center is off a bit, but I don't nitpick that anymore.  The top row of the back was pieced using a 45 degree seam.  It is imperceptible to the eye, but now that I tolk you you could probably find it.  In retrospect, I would have pieced the other two rows of same fabric and just made a bottom row....but I had lost, then found another piece after I committed to the pink fabric frames.


Here's the front of the quilt.  I really like how it turned out.  I was able to use all of the floral fabric.


The larger block is a Colorado Beauty  It is one flying goose unit and one rectangular unit using stitch and flip.  Because I went "gun-ho" and made a bunch of flying geese units, part of my square in square units are 2 flying geese sewn bases together.  The balance are square in square which I paper pieced which is my preferred method for this block.

With the 5.5" unit, I created a 4-patch. I used sashing around the center quad of Colorado Beauty blocks.  

I love the retro look of this quilt.  I quilted simply using wavy lines in one direction.  It is fast and looks nice.


Jack in Box Quilt


I purchased a Kansas City Star Quilt block book from Thrift Books.  It is a small collection of blocks that were published weekly by the Kansas City Star newspaper.  It includes a copy of the original block, and then a refashioning of the construction.

 One of the blocks that I quickly became enamored with was called Jack in the Box.  You can find other variations of this block here.

This 12" finished block uses two main blocks:  (1) flying geese (4 per block) and (2) stitch and flip rectangles (4 per block). Additionally there is sashing and an a sash block.  

The "refashioning" of the block involved using the 4 at a time, no-waste flying geese method.   I used that method and my Deb Tucker Wing Clipper to trim my FG blocks.  You can see that I lost a few points on the outside.  There are A LOT OF SEAMS in this quilt.  Accordingly pressing is important.  I ended up with several tucks on the face of the quilt--but that was more because I did baste my quilt properly or use my walking foot. 

This quilt  (36" x 36") was as much of an experiment with technique as using up some material that I had that would likely not see any use.  I  used the waste of the rectangular stitch and flip to make the 2" pinwheels.  I would not do that again. I used fabric that I had bought at Tuesday Morning (green/mint/black) along with some black material and a icemint material that I had purchased on line but did not meet my expectations. 

I had originally thought that I would just place 12" plain setting blocks, but I did not care for that look. As I wast futzing about, I realized that the icemint fabric would work quite well, and it exceeded my expectations.   I really liked the way the light and and the dark worked together.  I also have an error in the R1C2 where my geese are not property rotated. I should have picked it out but, I did not.

It was a really fun block, and I will use it again. I sent this quilt to my "niece: a 100 lb Rottweiler rescue.  It will something that will cover her dog bed and will be easily washable