Scraps

 There are tons of videos on how to manage scraps/crumbs.  I currently have a hamper by my cutting table into which I throw scraps, and a trash can into which I throw less than scraps.  And of course there is everything in between!

One method of managing scraps/crumbs is to sew it to adding machine tape to sew small scraps onto.  Claudia and Karen Brown have demonstrated this method. Though I'm an accountant, I have NO adding machine tape!  I do have some painter's masking sheeting.  It fits in a hand held roller that both tapes the top to protect surfaces.  As I was rummaging int my garage, I saw this and went "Hmmm!"

I grabbed the roll.  It measures 9" wide.  You can subcut it into any width, and frankly that is a nice size to work with.  I started with a 2.5" width so that I could put some small strips onto it.I did some test sewing of scraps to this strip.  

Sidebar:  I have been using Wonderfil Decobob thread.  It is an 80wt cottonized polyester.  I just love it.  Fine as frog hair.  Strong.  Sews beautifully but does require you to adjust your tension in your machine.

 This paper tore out so easily!  It was unbelievable how the paper literally just fell away from the seams.  I call that a win.

Of course the UBER-METHOD for managing larger scraps is to cut in squares and strips and sort into colors and put in tidy bins and....I don't want to go there.  That just overwhelms me.

I did pull out my Deb Tucker Wing Clipper tool and put the chart up for square sizes (using the 4 at a time method which is the only method I use).  Pawing through my scraps I picked out useable squares.  Depending on the size, it is either a goose or sky.  

I ended up making quite a few flying geese of varying sizes.  I figure that I will sew these together and then sash in between them.  May make a scrap quilt for personal use or shopping bags. I like DT's ruler because it has multiples sizes in one ruler, unlike some other brands.

I also had quite a few binding strips. One method I deployed was that  I sewed these together, a light and dark pair, and kept cutting in half and resewing for alternating colors. The piece was initially 2 strips wide, then 4, then 8.....you end up with some interesting checkerboards.  

A second method was to just make 4 patches.  So I am amassing a 4 patch collection using 2.5" squares uncut.  Who knows how far it will go?

I'll spend the next week sorting through my scraps and processing them in different ways.  I really admire the engineering mind of many quilters (Lori Holt and Bonnie Hunter) who can beaver on through scraps and make amazing things.  They have the industry of a beaver coupled with great imagination to see wonderful quilt patterns.  I have the industry of a beaver, but not with the ability to sort it into a quilt.  

While I cannot do that now, I can at least see the possibility of fabric into a block..and that is better than I used to be.  I'm still building my skills; I've come a long way.  Have a long way to go still.


Carolina Wren Revisited and Other Stuff

Well, the CW's in the grill HAD NOT FLEDGED.  I moved the grilled, peered in the nest and saw many a snuggled baby.  Either I have two mating pairs, or the begging fledgling I saw was from previous brood. Whatever, whomever, that CW has been chipping on deck asking for mealworms.  You may think that I'm imagining such, but I think not. (****update:  I was imagining....I believe the parents were chipping at their nestlings to invite them to become nestlings*** I've observed that during rainy period (v. sunshine) there are fewer bugs flying about. But, it is just a hypothesis (since updated~)

The thing about CW's is they hop about and put their slender, curved beak into every crevice seeking out morsels (tasty or otherwise).  The mealworms (my colony is now about 3 years old ) are fast food for hungry mouths.  Offering them in the breeding season helps hard working parents get a break. Also, if there is a single parent, due to death/injury of mate, it is a godsend.

My daughter's friend's husband has Covid. He is on day 9 of continual fever.  He went to the emergency room, and he's been diagnosed with the viral pneumonia and Covid lung that accompanies this wretched illness.  Why they did not get vaccinated, I do not know.  I hope that he has a full recovery; but he is not on the downhill yet.  Mid thirties; healthy; 4 kids.

While I am experiencing compassion fatigue for the unvaccinated others on the news, I feel none such apathy for people that I know.  So I send healing thoughts their way knowing what a terrible tragedy may happen and hope that a full recovery is had.

We have several friends who have refused to get the vaccine.  The "my body my choice" chant seems to be the core of resistance by many; however, when it comes to other health decisions on the part of others (that have no deleterious effects on others) they seem to want to insert their beliefs into THOSE decisions.  

If you don't believe in abortion, don't get one.  If you don't believe in the right to die with dignity, then slog it out and drag your family with you.  But no need to foist your belief system on others who might make other choices--and their choices have NO effect on your life.

Choices about wearing a mask, social distancing or getting vaccinated are choices that affect the health outcomes of others.  I can understand if a person does not want to get vaccinated; then wear a mask.  It is that simple.  

I think of the example of Jesus, and I wonder how evangelicals cherish his sacrifice to die for their sins, but they could not be bothered to put a @#$^%$%^@$#^ mask on to save a life or prevent an illness in themselves or any in their family or community.  It makes no sense.  Somehow the resistance to masks or vaccination has been bastardized to be in impingement on freedom. Alas human beings can make anything suit their rationalizations.

I'm confident that Jesus would not have compassion fatigue for such twisted thinking. He would not judge them. Though I'm pretty sure he would judge harshly those who purposely spread lies and disinformation for the sheer purpose of exerting power and influence over those who would subject themselves to such information.

It is the only mental model that I can build to make sense out of how my own responses to people are.  Accordingly, I will continue to exercise compassion (v. contempt) for those that listen to the bad actors, and focus my contempt and anger at those actors.

I don't call myself a Christian, but I do believe in the example of Jesus, and I call upon it when I'm struggling with being a better person.  I wish more would do the same.

Carolina Wren | Canning

Few birds are more industrious than the Carolina Wren.  This flitting, active, vocal, terrestrial birds investigate every nook and cranny of your property and possessions to find a suitable nest.  And they make several nests before deciding on one.

The alacrity of their nest building means that the grill of your truck will be empty in the morning, but stuffed full of mossy and grasses by evening. Putting a towel over the grill helps.  And speaking of grills, I opened the gas grill on the deck and found that these busy builders and considered this a suitable place.  they had to enter through the back vent...not very convenient, but these little guys can fit many places.  

Earlier in the season, when I found the nest (no eggs), I put it in a black plant pail and put it at the bottom of the grill.  Still an nestly protected place. They moved on.  But about 3 weeks ago, I decided to check on it, and the female flew out.   

Today I note that at least one as fledged as I spotted him begging for food (quivering all over with his mouth open) in a small, low sapling. I think that the parents are trying to coax others out.  I surmise this from the parent having mealworms in its mouth and chipping.  It finally gave up and went to the nest.  And when the mealworms were gone, he chipped and chipped at me (he can see me through the kitchen window) asking for food.

I like using my grill when I'm canning because the burner is so powerful, the water comes up to temp quickly. Plus that keeps the heat out of the kitchen. I didn't want to cause an early fledge, so I did not mess with the grill...both timings were certainly coincident...their "fixin" to leave, and my "fixin" to can.  I used my gas cooktop.  I had already made one batch of relish with 15 lbs of jalapeno peppers. I bought 30 lbs of peppers this time.  I scaled my prep over three days of slicing and culling the innards to make ready for grinding.  Grinding takes just a small amount of time. Sliced in half lengthwise, an apple corers makes it easy to scoop out seeds/wall.

To that I added red onions.  Further, I went out to the garden and picked green tomatoes...they won't turn as August has a progressive waning of the sun.  Of course my husband chastised me that I should have taken smaller ones. We cannot eat the tomatoes we have, and we give many away. He's a tomato hoarder!

I cut them up ground them.  I then set them in a sieve to drain.

By the end of the day on Saturday, I had been on my feet for hours.  All in all I had made 62 pints/half pints.  We will enjoy both using and giving as gifts.

Fabric Scores, One Block Wonder Blunder, My Quilting Journey

 I found a great deal at Hancock's of Paducah.  Honestly, I find many superlative deals there.  I recently purchased  2 Fat Quarter Bundles

Here is the Andover Fabrics Laundry Basket Quilts Secret Stash Warm Fat Quarters.  There are 20 fat quarters for $39.99.


I also bought the 20 Cool Fat Quarters for $29.99..I'd give you a pic, but at that price, they are long gone.  Both are fabulous deals.  I find that  I get the best deals on fabric from Hancocks.  I also got a 10% off coupon which I was able to apply. 

To get free shipping (they have a reasonable $5 flat rate) I had to spend $70, so I bought a Mari Michel 60 degree corner trimmer.  It is small, and I can use this to mark hexagon stitch points as well as make a small triangle quilt.  

I've not done much with triangles until I tackled my OBW.  I'm so happy with how my sizing up (from 3.75 to  3.875 (7/8) has improved my ability to have each of my blocks the perfect size.  I lamented in a previous post that some of blocks were wonky despite my taking the greatest care in cutting, sewing and pressing.  Slightly upsizing (and I have no problem working/measuring with eighths) and then trimming slivers to have perfect blocks for perfect points will be welcome.  

Perplexed or One Block Wonder Blunder:   Even though my OBW fabric choice was halved lengthwise (meaning I would have exactly enough for a sister quilt), for some reason I was not able to 6 repeats from the remaining half.  I'm thinking that I cut my side hexagons halves from it, which would explain the shortage. Now, that was REALLY poor planning or more poetically stated as a One Block Wonder Blunder). Therefore, (UGH!), I'm only able to get 1/2 the blocks (I got 49 blocks out of the first).  I'll work it out to put some contrasting blocks into the layout or simply use full v. pieced hexagons in the quilt.  OR...I can make Posie blocks (made from 4 squares) that I cut into a hexagon.  In fact, I think that I'll do that.

I am now entering my 3rd year as a quilter.  I'm a long way from embarrassment and longer way still from mastery.  However, I can make pretty quilts.  My interest is not so much in free motion quilting largely due to my domestic machine not having but 7.5" of harp space.  My newer Bernina (B530)has the BSR which is lovely, but with a narrow harp, it really is a hassle to move your fabric about.  

Nevertheless, I have no remorse in doing straight line quilting.  Have walking foot, will travel! Over this next year, I would like to develop my free motion quilting skills.  If I were to simply spend 20 minutes daily practicing, I'm sure my skills would improve dramatically.  It is all about building muscle memory. 

But the truth of the matter, there are few people in my life that would appreciate the quilting more than the quilt itself.


One Block Wonder Followup | Strip Width

 I cut my OBW using the recommended 3.75 strip width.  I had some surprising (alarming, disappointing) variations in the height of my blocks.   Now that I have a 6.5" hexagon ruler, I wanted to use this ruler to trim down my blocks.  My OBW blocks, even though carefully cut and sewn ended up with some surprising wonkiness...Sewing 6 triangles with 12 edges of bias will do that

First I did my normal block at 3.75" with careful seams and pressing.  Even though I exercised great care at all stages, I  still ended up with "some here and less there" when I lay the ruler on top of the block. 

I experimented with a 4" width. I had to trim too much off. 

Next up. . . .  I went with 3 7/8ths and that worked out perfectly.  I cut just a small amount around to end up with a perfect 6.5" height block. I will use this size in the future to give myself some wiggle room.  I really want my next whack at the OBW to be perfect, as I will gift it.  Having a ruler to help me "square" the block up nicely will go along way toward improving the end result.

If you are making 6.5" OBW, I highly recommend a hexagon ruler and adding an extra 8th of an inch to your strip width.  It gave me a perfect trim down with negligible waste.


Unpicking

Unpicking:  I had to unpick an entire binding on a quilt because I simply didn't notice that my needle position was in the middle rather than the far right (necessary because of my walking foot).  Accordingly, my seam widths was such that  I could not wrap the binding to front to save my life.  I left it that way for a few weeks--hoping it would miraculously heal itself.  It did not. Yesterday I tackled it.

My favorite unpicking tool is my Havel seam ripper.  It plus whatever entertainment I have on my portable TV monitor + Fire Stick makes short work out of long, arduous tasks. I ripped out the binding, tossed it because it was not usable; made new binding; sewed it on.  I now have 8 Sparkle Magic Shine quilts for the New Kent Christmas Mother program this year. These will be perfect for 0-3 year olds girls.

Enjoying quilt made for self.  The quilt I finished for myself is something that I'm really enjoying using. I'm reminded that no one is ever going to see that your points are not perfect once the quilt is washed. For this quilt, I put a 108" quilt backing in a dark grey print and bound with same. (below is just the quilt top. )

Most of the fabrics are from Anna Maria Horner's Skipping Stones collection which I filled in with some other fat quarters that I had that I felt complemented the fabric.


I love these de-saturated colors.  When I was cutting my quilt batting, I got the fabric out of kilter, and I had to piece some fill in pieces.  It was a pain...but you couldn't look at the back of the quilt and see it.

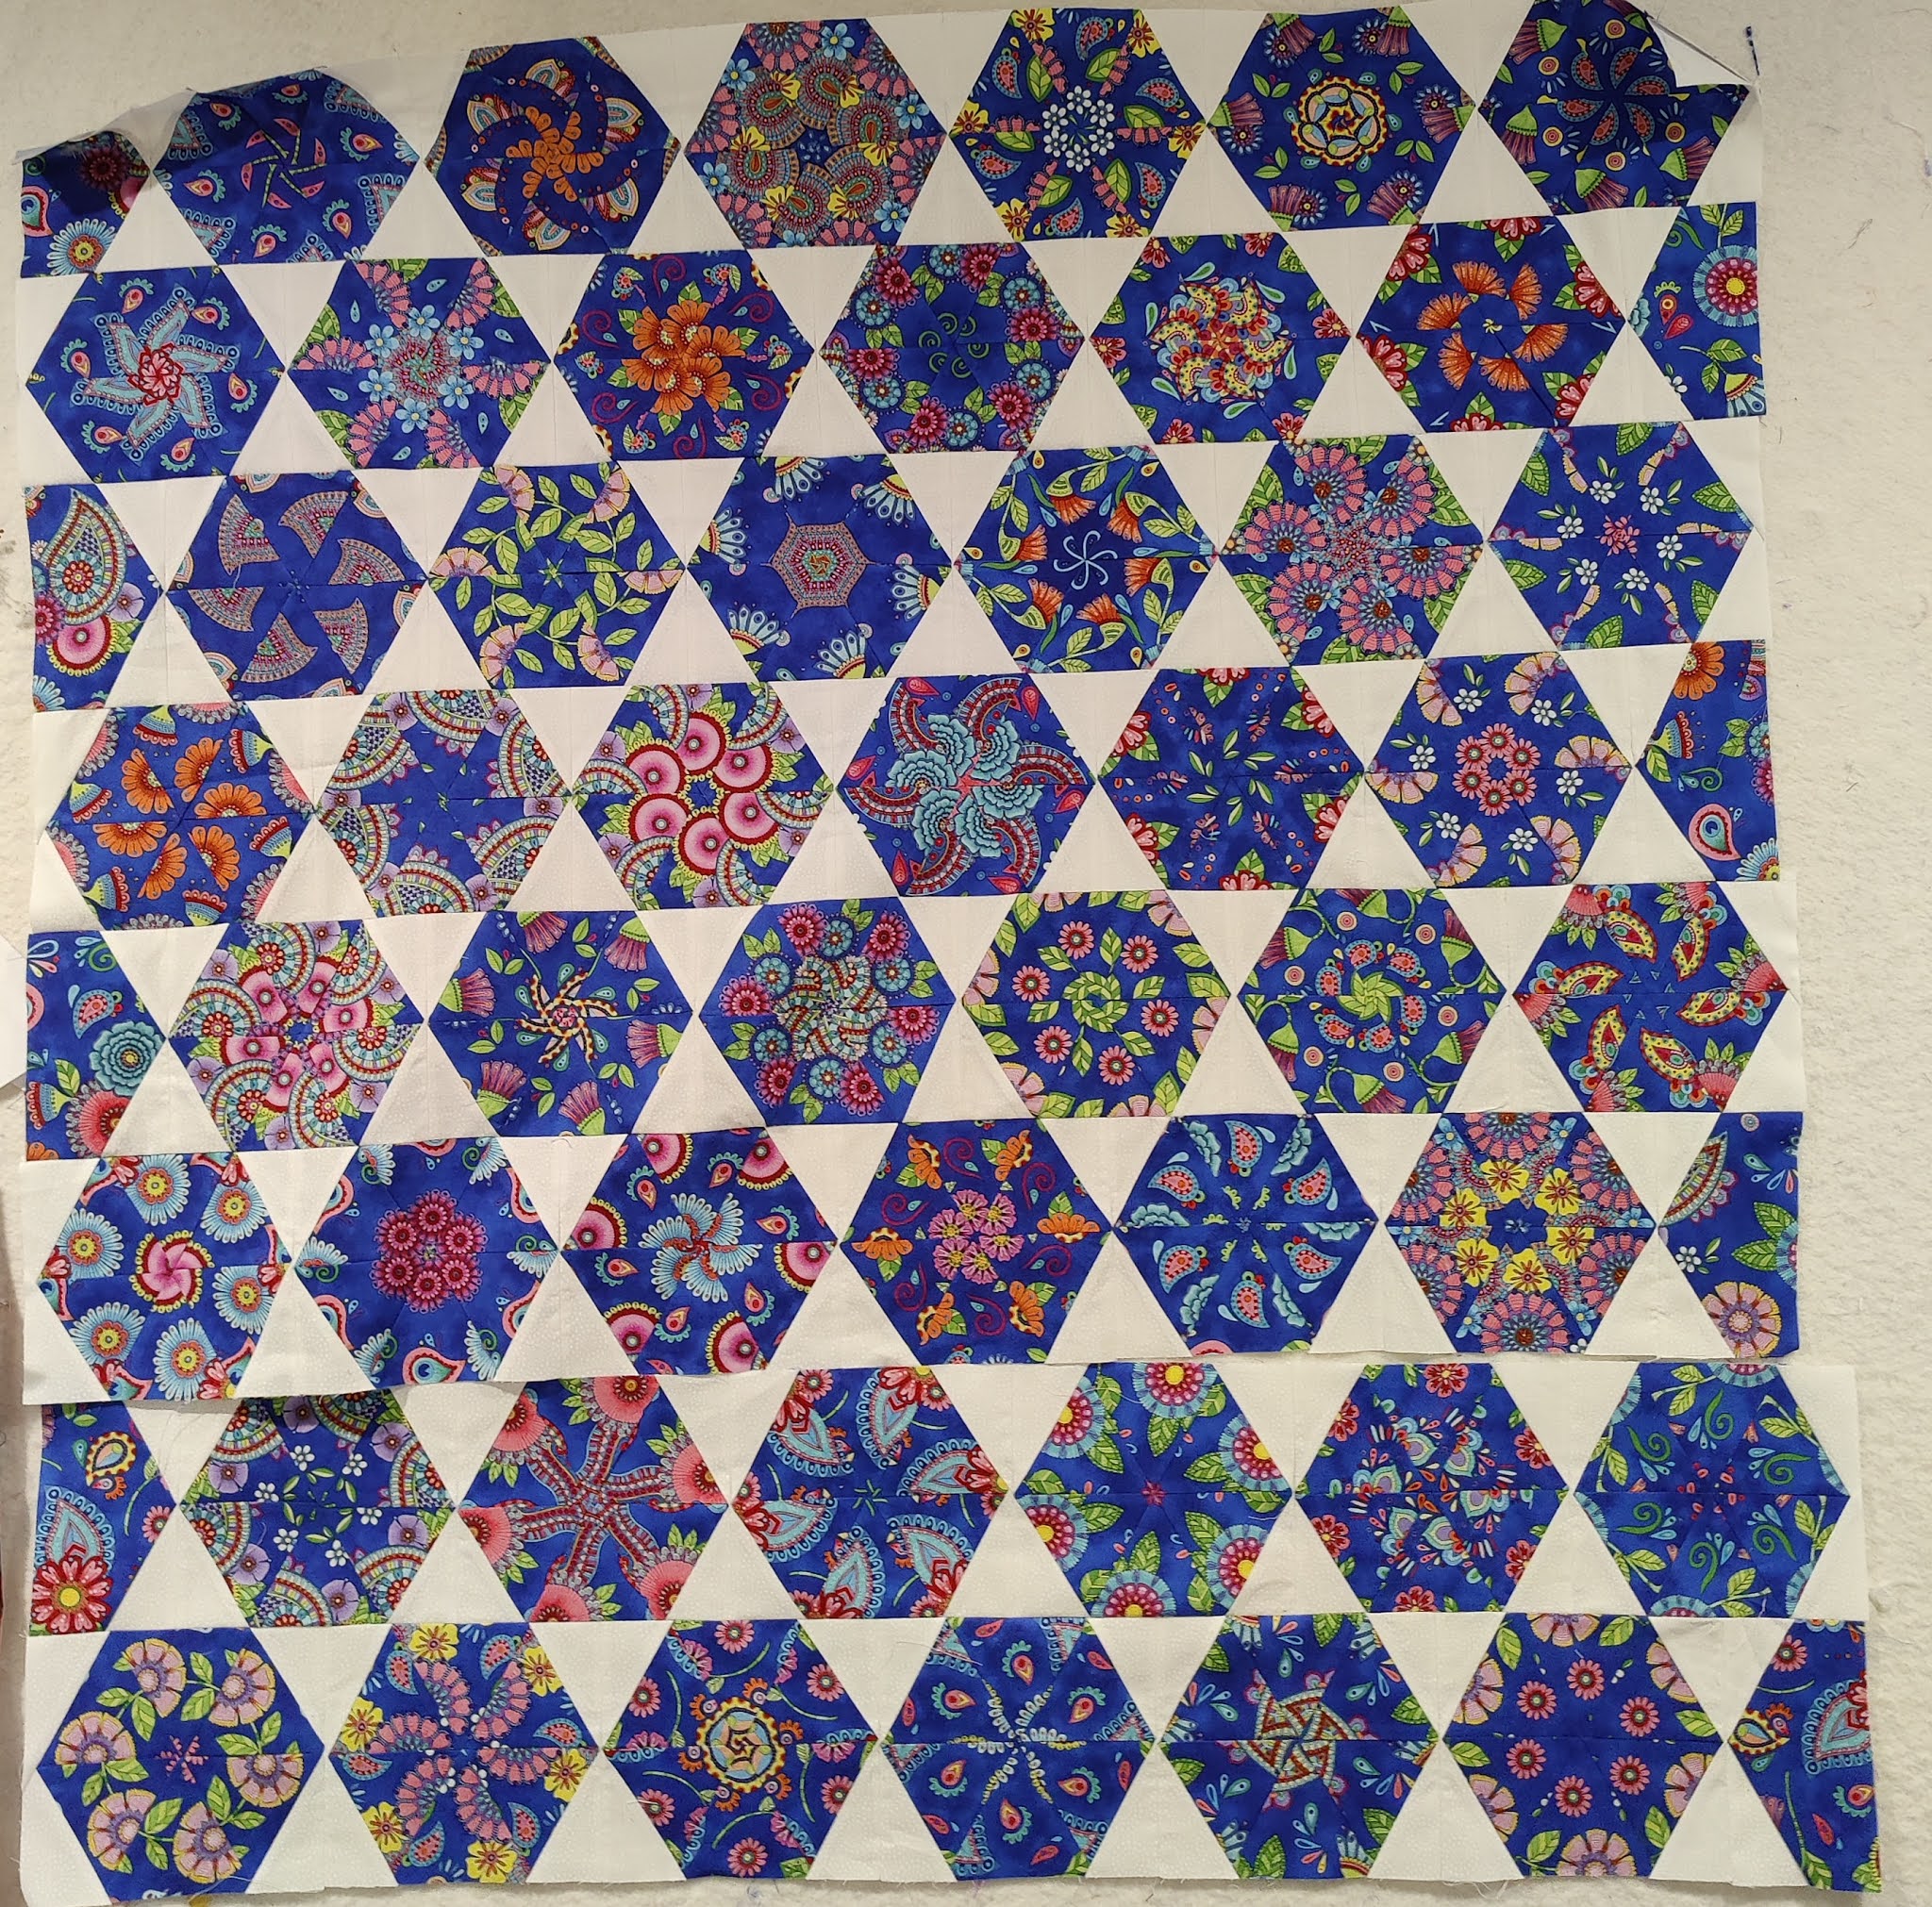
One Block Wonder:  As my quilt blocks were so unique, I elected to put them in a hexagon star quilt. This was my first time sewing this block.  I'm confident that my piecing was accurate, but I may have had a different strip measurement on one of the rows which made some of my hexagons about 1/4" (and a fat measurement at that).

When I put the rows together, my points are pretty far out on several blocks due to the "trimming" I had to do which messes up where "stuff" will line up when piecing rows together.  I think that I'm going to keep this quilt for myself.  I have enough material to make another.

On this quilt, I had planned to lay out the blocks in vertical straight rows with sashing.  I could have dealt with the wonkiness better this way.  As such, I put a triangle in each of the corners to straighten out the block.  Here's what it looks like on my wall...actually, the photo does not make it look so bad!


But the zoom knows....


 Gasp!  The quilt police would certainly issue a citation if not haul me in!  Now, this quilt top would be perfectly beautiful and serviceable.  But my goal is to be a little more in the neighborhood.  There just wasn't any fix available to me at this point.  While the above is out of whack, further down the road is not.

Had I made an earlier commitment to this layout, I would have put full triangles vs the corner 1/2 triangles.  One thing about undertaking new things, you don't know what you don't know! Each of the blocks are fun and unique.  True, some of the patterns hare a wee bit out, but nothing that none but the pickiest would notice.  I would use my dental floss method again. Further, as it is a textile, you cannot control the printing. For any who have made home decor stuff, half the trouble is straightening out the print so that your curtains lay straight on grain.  A carpenter's square still is a tool I have near my machine.

When I made this, I took my yardage and tore in it half lengthwise. So I have enough to make another pass, and I think that I will.  Also as I have a hexagon rule now, I can more effectively trim my blocks. 

Here's a closeup of some of my blocks--they are magical, whimsical and surprising...no one block is the same as any other. I cannot even choose a favorite.


Skill Building: Hexagons


I had some leftover fabric from a quilt back.  I decided to use this strip to make hexagons in the dark gray fabric.  I paired with white.

There are surprisingly few videos on how to piece Y seams together. Below is a close up of my Y seams which is not too shabby.

Now I had lots of practice in trying to do LeMoyne Stars the old fashioned set-in way. These 120 degree angles are far more forgiving than the 90 degree angles.

You must mark your hexagon's points at 1/4".  If you have an equilateral (60 degree) ruler with holes on the points, you will have a perfect tool for a perfect dot for a perfect DO NOT CROSS point on your block. I used a Pima marker and marked a dot.  Pima markers do not bleed like Sharpies (they are both permanent but when you put a Sharpie on the fabric the dot spreads more than a Pima marker.


The Marti Michel Corner Trimmer has these markings.  Some Hexagon Rulers have them, some do not.  I think that they are essential to quickly and accurately marking your hexagons.


The very best video on sewing Y seams is this one by Sarah Payne.  You can find it below:


I will tell you why her video is the best.  Most every other video has the viewer 

  1. Marking the entire seam allowance on all blocks; or
  2. Marking the points on each + sticking a pin through the matching points.

My quibble?  All you need to do is mark 1 block.  Because you are lining up edges together exactly, the 1/4" point on your marked block is going to be exactly as the one behind it.  Marking both and putting pins through the dots and more pins...well that is much more work without any quality differential in your output.

Of course as as serial glue baster, I match my edges and put a dab of glue along the edge so nothing shifts.  

Therefore....if you mark your seam allowance with dots, AND never go past the dot, AND line your edges together perfectly (and of course cut perfectly),  you will not have any puckers.

The hardest part about any of this is pressing the seams.  In addition to Sarah's video above, I found this great video by Emily Breclaw.  She demonstrates the spinned seams of 2 half hexagons (which I wrote about here ) as well has pressing and spinning hexagon seams.


My next skill builder is to cut the half diamonds and inset them..  I can see this as being a cute baby quilt pattern using more colorful fabric in place of the gray.  Though I have to say, I'm a big fan of gray and white.

My hexagons were 6.5" cut which made them easy to handle, and the piece built quite quickly.