PFFFFFFFFFFFFFTTT!

 I've been working intermittently on my Modified Betwixt quilt.  It is probably the most challenging quilt I've undertaken. The challenge has to do with the meticulous cutting and piecing necessary to make a 9" nine patch.  Small, precise pieces..  I have to get my bent precision tweezers out to lay the pieces together.  (I am also glue basting to ensure no shifting--small blocks = no room for error).  It's just alot of !#$%$%#&^  1.5" HST's (128) and flanking triangles (256) and large triangles (128) in 4 of the 5 blocks that comprise Block 1.   The middle block is a 9 patch (1.5" each), and the remaining 4 squares are blissfully 3.5" squares.  My Stripology ruler zipped through that in no time.

The PFFFFFFFFFFFFFTTTT! (credit Bill the Cat) is earned as I was sewing the flanking triangles to a batch of HST's I turned the piece incorrectly on the second flank and ended up with a disaster.  Luckily it is not a huge number of mistakes, but the seam ripper came out.  Unsewing...I've not done it in a long time.  I should have looked at my reference block again and double checked the angle of the triangle to ensure that I got a smooth HST when joined and not something that looked like it was run over by a car...all crooked and pointed the wrong direction.

My Havel scythe seam ripper works beautifully.  And...they are @#%#$^ small blocks.  So I only had to cut 4 threads and then I could pull it out cleanly on the other size with my precision tweezers.

I did a little fabric shopping at Hancock's. They had the beautiful Willow Line of fabric Windham on Sale.  Well, I was able to obtain all of the fabric that the original Betwixt pattern called for except for 2.  I made acceptable substitutions.  I frequently troll looking for bargains.

I purchased. 2 fat quarter bundles of Marcus Fabrics, Las Flores.  Twelve fat quarters for $20 was a very good deal. Additionally, I bought 36 yards of fabric for an average price of $4.62 per yard.  That's a good bargain!  The fabric was already discounted at 50% off and I had another 15% coupon.

So no more fabric purchases for the balance of the year.  I'm going to work through what I have and complete my quilt tops (binding/backing/quilting) so I don't have a ton of UFO's.

I never buy fabric that is specified in a pattern (and I rarely make patterns), but the Betwixt pattern is so beautiful and the fabric is so sumptuous, I was glad to have stumbled upon it.

I will need to treat the 63 blocks in this quilt as a marathon v. a sprint.  The nice thing about working with fabrics that you love is that they are a joy to work with--even if you are unsewing.

It is physically demanding to cut, trim press this magnitude of blocks.  Nevertheless, I'm confident that I have efficient processes --and I need to refresh my reference when sewing the @#%$#^% flanking triangles.


Kidney Stones

IF you are scientifically minded, here is a great article.  

After a month of battling the passing of a kidney stone, I received the diagnosis: 2 9mm kidney stones impacted and needed to be surgically removed. (Go up through urethra, bladder and blast with laser).

I had my procedure last Wednesday.  It required inserting a stent for a week which was not very comfortable. Yesterday they pulled the stent out.  It looked like speaker wire! Still experiencing some residual discomfort--enough to interrupt sleep.

I remember reading where bladder pain/issues ranked pretty high up on the misery scale for affecting quality of life.  I agree. I typically slog through things--and I drank copious amounts of water in my self diagnosis, self-treatment (both a bad idea).  I finally went to Patient First after not being able to get through to my regular doc.  Got a bladder infection diagnosis.  Put me on meds.  Did not xray me, though they should have as I said that I thought I was passing a stone.  As soon as my 5 day regimen of antibiotics completed, my symptoms were back.  I went to a urologist.  Best decision ever.

 At the urologist, I was xrayed.  After reviewing the xray, the doctor said I needed a CT scan to get a better picture.  I made the mistake of hearing "calcification" in the bladder area and feeling I should read more about it--in the middle of the night of course.  I found all manner of bladder cancer articles and was awake for the rest of the night.  

The only reason for my heightened sense of concern was that two of my English Setters had bladder cancer.  There is only a 2% rate of bladder cancer in English Setters, and 50% of the ES's I owned had it.  So my mind went to our "contaminated" well water, thinking that I might have arsenic in the water which is the typical cause.  Such is the calculus that a troubled mind goes through at the midnight hours.

A stone that will not pass causes the ureter and kidney to dilate due to pressure build up. That means that slogging through an unpassed stone is not a good thing. If you think that you have a stone, make sure that you pass it (yes you should collect and sieve your urine).  If you do not pass it, seek medical attention.

Part of the procedure is to have the stones analyzed to determine the mineralization.  My stone was predominately Calcium Oxalate, the most common form.  My stone formation is likely due to my not drinking enough water.  I'm not water drinker.  Or a soda drinker.  I just simply do not drink much.  That's a problem and causes an imbalance of mineralization to urine production.  More mineralization means greater chance of stone formation.

So there you have it.  I have to go from my parsimonious water consumption--poor habit which led to the stone formation-to floating away.  The recommendation is at least 10 10z--that's about 3L of water per day.  I will feel like I need my own personal ark to keep from floating away.

Modified Betwixt | Test Blocks


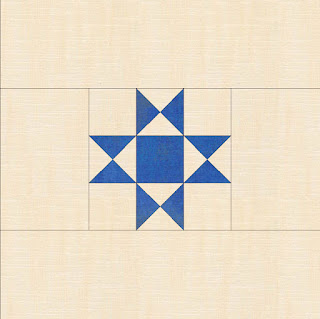
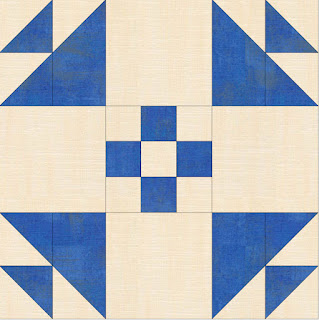
Here are the two blocks that will lay alternately in rows/and columns.

Learnings:

  • Making test blocks will ensure that you encounter and any address any issues that may arise.
  • Determine alternative piecing/construction.
  • Ensure that your scant 1/4" is appropriate
  • Evaluate pressing directions etc

Neither of my test blocks measured a full trim down size of 9.5"  I'm off only a bit. I had to ensure that my best scant 1/4" seam is used to get full measure for the block .  The second block is particularly audacious given the amount of seams.   But it is just a precious little block. 

Little is the operative word.  While I will proceed with this size block, in the future, I would use a 12" finished block, making each patch 4".

As I was piecing this together, I wondered what the top block would look like with the same corners as the 2nd block.  I created a circle.  Here is the quilt using that modified block in a darker scheme. Very striking geometrics don't you think?


Modified Betwixt | Block Engineering


In making my test block for this block, I  found that the corner units which as configured are  2 HST's and one folded corner unit were too bulky.

View the picture below.  The unit on the left has the original configuration (2 HST's and one folded corner unit)  I modified the construction by using 1 HST and 2- 2" squares cut with folded corner to create the right hand unit. I used a 2" strip and cut with my folded corner ruler v. making a 2" square which creates too much waste.

 I simply sewed the two folded corner squares (these are squares that are cut with the seam allowance so they are fatter than an HST by the amount of the 1/4 seam allowance.) As the unit is 3" finished, I cut a 3.5" strip and used my folded corner ruler to cut the white HST.  I sewed the 2 units together and trimmed down.  You can see that the unit on the right is much "cleaner".  It lays flat as it has one less seam.  Me likey.

This block is challenging, and it is a reminder that I will never undertake a postage stamp quilt.  The unit above has 1.25" finished HST.  That's small.  

The easiest way to cut these pieces was to cut a 2" strip. I worked from the right to the left, using two rulers. The first cut is on the right to cut the folded corner...basically it cuts a square with the included seam allowance.  Notice the bottom right hand corner.  The cut line is 1/4" above the bottom.


Once the right hand cut is made, the folded corner ruler is removed and the left ruler is the straight edge.  It is quite quick using this method and working from right to left.  Yes, there is a small amount of waste working this way.   When working with such a small size, it is not usable for anything I want to deal with.  I cut these 4 at a time. No waste can be achieved by simply make a straight cut first to true up end, make angled second cut on the left (use a helper ruler so you don't have to turn fabric), and turning the ruler around to line up on the diagonal. However,  the sharp corner needs a trim.  I like the trimmed off dog ears for this unit because it allows me to assemble the full unit easier.  See how nicely each of these will fit?

These units fit beautifully for my corner unit re-engineering.  I am very pleased.

Below is my QST with the Paisley Palette and Kona Snow. I made these with the Magic 8 method for HST's.   Spinning your seams on the reverse will allow the block to lay flatter.  I have to repress mine for that effect.


Spin your seams for nice, flat block


Modified Betwixt - 2 | The Magic of the Magic 8 HST Method

💠  Google docs spreadsheet to enter your calculations for your next project 💠


Today I had a chance work on my Modified Betwixt.  I continued on making my test block for the Ohio Star to include utilizing the 8 at a time method (a/k/a Magic 8). I wasn't paying attention on my first pass and ended up with something unusable because I didn't f-💣ing pay attention to the horizontal and vertical bisecting lines.  Oh geez...put them in the scrap pile.

Once I solidified my construction method on my manifold QST units, I was happy to buzz along without any further hiccups.  The Kona Snow is just a beautiful accompaniment to my fabrics.

My first Ohio Star went together beautifully. The Kona Snow is just a beautiful accompaniment to my fabrics blue and gold fabrics.  One down, 31 more to go.  I'm about 1/3 of the way through making the QST units. Everything else is simply a 3.5" square.  The Stripology ruler made short work of that. Even using the Magic 8 method, hourglass units are time intensive.  

The Magic 8 Method is a simple method once you understand the basics. Below is a diagram of Half Square Triangle Units. 

💡 If you have a rotating mat, there is a perfect center where your square will line up with 45 degree diagonals as well as bi-lateral marks for each 1/2 length cut.  It is super useful.  I STRONGLY recommend that you make your bilateral cuts first.  These are the outside of your HST's, and the unit is together, therefore stable.  If you make your diagonal cuts first, then you have some fussing to do.  Once you have made your bi-lateral cuts

For my purposes, I required QST's (quarter square triangle) that finished at 3".  For each pair of HST's (half square triangle) units you get 1 QST.    You can see that there are 4 quadrants that each have a HST unit.  Notice that each unit has outer edges that are cut on the straight of grain (either cross wise or length wise).  The bias is on each diagonal and safely encased in your careful stitching.

After marking 2 diagonals and sewing a 1/4" away on both sides of the diagonal, the unit is ready to slice and dice.  A rotary mat can be helpful here, but not necessary.  Cut on each diagonal and then cut on each horizontal and vertical mid lines. While the midlines should bisect your diagonals in the middle, it's worth a double check.

While there are tables that show the math, if you put this on an index card and put it on your sewing board, you will always have it handy. Your phone has all the calculating power you will need in your sewing room.  And, my spreadsheet which you can find here will help you along.

HST MeasurementsCut 2 squares as follows

  • Pure Math:  Finished unit (FU) + 7/8"
  • Trim down Math:  Finished unit (FU) + 1" 
  • Example:  Finished HST unit = 3"   Cut 2 squares : FU +  1" or 3 + 1 = 4" squares needed.

QST MeasurementsQST's are comprised of 2 HST's.  As there is an addition of 2 more seams, the math is a wee bit different.  Cut 2 squares as follows

  • Pure Math:  Finished Unit (FU) + 1.25"
  • Trim Down Math:  FU + 1.5
  • Example:  Finished QST unit = 3".  3" + 1.5 = 4.5" squares needed.

Adapting to Magic 8 Method.   Not mysterious!  We are simply taking 4 cut units and placing them in one square 2 x 2.  Therefore, take your measurements that you come up with above and multiply by two!  Voila! You have your square dimensions.  To wit:
  • Magic 8 HST:  FU = 3"  Squares = 3 + 1 = 4.  4 x 2 = 8" square pairs needed.
  • Magic 8 QST:  FU = 3"   Squares = 3 = 1.5 - 4.5 = 9" square pairs needed.

Squaring up your HST's.  I have found that squaring up HST's using triangle and TRIMMED block size line on the seam line (e.g.  3" line for 3" block on seam line) on base is an easy and accurate way to square up your HST's. Point your your unit so that the corner faces 2 o clock so that you have easy access to both trim sides.

Modified Betwixt -1

 My first step in making the Modified Betwixt Quilt is to make the 9 patch center blocks for Block 1.  I elected to go with just the gold and blue.

The importance of doing test blocks cannot be overstated.  I opted to make my 9 patches using the strip piecing method.  The strips are cut at 1.5" and then sewn in dark, light, dark strip set and light, dark, light strip sets.  Here's where you need to test your 1/4" seam to determine how scant it needs to be with your choice of fabric and thread.  I sewed my normal scant, and I ended up with a wee bit wide finish by about 1/8" of an inch.  With 1" finished blocks inside your 9 patch, there's not so much fudging room.  I was able to make it work.

When working with strip sets, it is very important to press well to (1) not have any folds in your fabric and (2) to press straight so that the strip set does not get wonky.  I press and starch.

When I sewed my 9 patches, I spun the seams as you would in a 4 patch.  (I'll include a pic later). See pic below. It helped make the block lie nice and flat. 


 Here's the fornt of the block.  I just love these colors together!


I'm really loving my fabric choices.  These are both fabrics that I bought at deep discount, and they go marvelously together.  I am using Kona Snow as my background fabric.  It is a creamy soft white--rather belies the name.  You think of snow as being quite bright.  It's worth it to get whites, grays and offwhites in several colorways so that you can keep swatches and know the tonal quality against your planned fabrics.

I pl
an to gift this quilt to my son.

Modified Betwixt Quilt--The Beginning

I plan to make my modified Betwixt Quilt.  As I do so, I will note what I'm doing; what I'm learning; and what I'm lamenting along the way.  I hope that you will follow along!

The quilt is comprised of 9 rows and 7 columns for a total of 63, 9" blocks.  There will be 32 Block 1's and 31 Block 2' (Ohio Star).

Fabrics used are Andover 5468 Gold; L Berringer Paisley Palette in blue and Kona Snow.  The Andover 5468 perfectly picks up the gold in the Paisley.  Of course digital renditions do not do it justice.  I think that this quilt will be quite charming.  I may elect to put a border on it.


This quilt's blocks number 2. Each is a 9 patch, and some of those 9 patches are compound blocks.  I plan to approach this using mass production! Here's my lay approach to finding the most efficacious way to cut and construct the blocks. I'm still a beginner quilter.  It is important to me to work efficiently and accurately.  I want to use the BEST method to leverage my time, my tools and ensure accurate and happy results.

I'm writing as I'm thinking here.  I will make a test block for each to determine that I'm cutting and assembling correctly.  As you read on, you will see that there are a mind numbing amount of blocks!

Let's start with Block 1:  quantity of 32.  


Thank goodness I'm writing this post to that my thought process can get to a logical (if not convoluted path) to a conclusion  (After making test blocks I modified my approach.  I struck out the old ideas and updated with settled on approach)

The block components will be

  •  (32) 3.5"C (3" F) 9 patches
    • Piecing Approach: I will strip piece these by taking a Bk,G,Bk strip (need 2x as many) and a G,Bk,G strip and sewing together and then subdividing by 1.5" and then sewing together to make the 9 patch.
    • Cutting aid: I will use my GE Designs stripology ruler to make the subcuts. (No updates.  This method worked perfectly.  HOWEVER, TEST your block and modify your seam allowance to account for YOUR fabric and YOUR thread so that it measures correctly at 3.5" trimmed)
💡 Test your seam allowance for the fabric and thread that you are using and adjust accordingly so that the middle seam is exactly 1" wide.
  •  32 x 4x 2256 128 1.5" F HST's
    • Piecing/Cutting Approach:  I have L. Heinrich's Perfect HST's.  I will make the 1.5" finished HST.  I will cut 6.25 x 9.75 rectangles and make 16 at a time.  I will need 16 sheets of paper. (Update: I went with Magic 8 Method and used 5" squares of fabric for each color.  I trimmed my blocks using triangle trim method (trimmed measure on seam line, and trim each side.  Open and press.  Perfect.).
      • simply stack fabrics, overlay the sheet, stitch as noted, cut where noted, rip off paper.
    • The stitch and flip block could be converted to a plain square and an HST which would require another 4 x 32=128 HST's.  I'd rather not have the additional seam, so I'm electing to create the waste from 128 stitch and flips. (Conscious decision making). Update: When I made my test block, I didn't like the stitch and flip--too many seams.  So...I cut flanking triangles of 2" strip using my folded corner clipper and paired with HST to form the other side. Perfect.  Folded corner clipper created clipped corners on base triangle which really helped to line up.
  • 4 x 32 = 128 stitch and flips. Large triangles cut from 3.5" fabric strip with folded corner ruler.  You could also cut squares in half.  Folded corner clipper created clipped corners on base triangle which really helped to line up.
    • electing to do this rather than break it up to a square and an HST
    • Cutting Aid;  I have an idea, but it may not work...I'll fill in this blank.
  • 4 x 32 = 128 3.5"C (3" F) squares.  
    • Cutting Aid:  Stripology Ruler. (Update:  Quick, Quick Quick!)

Let's take a look at Block 2 The Ohio Star.  Quantity of 31 blocks.


    • Corner Squares:   4 x 31= 124 3.5" cut squares Kona Snow
      • Cutting aid:  GE Stripology ruler for all subcuts
    • Center Square: 1 x 31 = 31 3.5" cut squares from gold fabric
    • Hour Glass Units 4 x 31 = 124 hourglass units.
      • Hourglass units require HST's that are 1.25 larger than desired finished unit.  
        • 3" finished units will require HST's of 4.25"
        • I will need 2 x 4=8 4.25" HST's per block x 31= 248 HST's (ugh)
          • Cutting/Piecing: I will use an eight-at-a-time method which cuts each unit on the straight of grain with bias on the diagonal only as with traditional method.
            • Math = 4.25 C + .25 additional allowance to trim down = 4.5 x 2 = 9" square (one in blue and one in Kona Snow) that will be cut 8 eight ways (creating 4.5" squares.  I will need 31 of these 9" squares with yield of 8 x units for get my hour glass units.
            • I saw other math that stated a more generous allowance, but I found that I had PLENTY of extra room adding just .25 more. Anything more is wasteful in my view. For this reason I believe it important to explore and specify for yourself best practices that you wish to adopt in your quilting.
      • 💡 My best practice is to run a bead of glue across both diagonals for the first pass of 9" squares.  This glue holds the two pieces precisely together for NO shifting.  I mark sew lines (v. just the diagonal) but this is a preference thing. I moved to Bernina which has a gaited foot. The gated foot is the perfect visual (v. the side of a 1/4" foot).  So I changed to making just one diagonal.  However if I sew on Brown Betty, I'll mark both lines.  I also mark the 4.5" cutting line across both axis of the square. As I moved forward, I omitted these lines, and measured the 1/2" measure off the ruler.  Where the diagonals meet in the center provide a good visual. Put my QTools vinyl stop on the ruler ensures I always have a clear line on measured edge.
        • After these HST's are cut, pressed and trimmed  and ready for 2nd step to transform into a QST, I run a bead of glue down the next diagonal, and match the diagonal seams exactly, and then press.  This provides a secure unit for the second diagonal sewing.  The second diagonal is perpendicular to the first.
        • After sewing on either side of the diagonal, I cut on the diagonalI modified this step to leave the unit SQUARE and squared up first using the sew line on the trimmed measure mark (in this case 3.5").  I found this much easier than cutting first on the diagonal. I then square up my units using my Large Folded Corner Ruler Antler (use a triangle ruler where you understand the lines) and alternately my 6.5" Tucker Trimmer.. and alternately my Creative Grids Half-Square 4-in-1 Triangle Quilt Ruler - CGRBH. The latter is easier  to see the lines as it has less lines.  I line the 31/2" line at the seam and perfectly match the perpendicular sew line with the corner of the ruler. (If you don't sew straight either one of your perpendicular lines will not line up consistently across the length of the measure.) This trim makes a perfect 3.5" finished unit.  Press open and trim dog ears. 
Whew!  I have alot of work to do.(This process has been mind, hand, eye numbing)  But putting in the time to design the blocks, audition blocks, colorways, and thing about my construction techniques will ensure that I get a good result and no missteps.  And of course...make a test block first for each.  

I will break this up into small pieces.  I'll update my progress on this quit.  I'm so excited!

Note:The repetition of so many steps for so few blocks assures that you will become the Henry Ford of your sewing production line.  As you can see from my updates above, my inner Henry Ford offered several suggestions.  If your reduce one mark, turn, trim etch over hundreds of pieces that you are putting together, you save time.
 

Spatially Challenged | EQ8 | Rendering different layouts

I purchased  EQ8 earlier in the year.  I am a bit of a computer nerd, accordingly, I appreciate digital help.  Because I am spatially challenged, I am unable to conceive of blocks and color scheme differentials in my head without the help of a visual aid. My objective of this post is to demonstrate how EQ8 can help you audition block configurations as well as colorways to create a quilt that will not surprise you in a bad sort of way.

I find the program a wee bit challenging as I'm having to flip from more traditional drawing programs. Accordingly, in my "bull-in-china-shop" approach to learning a new program, counterintuitive stuff trips me up.  I learn my doing.  Finding patterns and then becoming a block and pattern detective helps me learn the program.

I shared the beautiful pattern, Betwixt by Wendy Sheppard, which is a free download at windhamfabrics.com.  The pattern consists of two blocks measuring 9". With no border, it measures 63 x 81.  With the 6" border, 69" x 87".  This beautiful pattern is the baseline for my experimentation.


  • Block 1 is a 9" banded Ohio Star .  In the pattern, they are made from the same colorway.
    • Ohio  Star as 1.5" finished pieces to construct the middle star 9 patch
      • (5) 1" background blocks 
      • (4) 1" featured fabric/background hourglass blocks.
    • 2.5" banding on sides and bottom
  • Block 2 is a 9" 9 patch in 8 color ways of indigo, lighter blues and linen. The corner blocks are constructed the same, just turned so that each colored corner faces in.
    • (2) 1.5" HST's in each corner paired with
    • (1) 3" x 1.5" folded corner unit

(In my test block I retooled the block because it was too bulky.  Here's the substitute unit)


Block 1

Betwixt Ohio Star
Block 1 Banded Ohio Star 9" finished

Modified Block 1 (from my musings) is a full sized, v. a banded star (for the pattern that I settled on).


Block 2

Betwixt Block 2 - 9 Patch
Block 2


I created a project in EQ8 with these blocks to dissect the pattern, and experiment with different layouts. With EQ8 you can substitute blocks and colorways and do all manner of flipping and rotating.  You simply save the "new" vision of your quilt to the project book.  You can then go through a view your musings and delete any monstrosities that you have created.

Below are some of these renditions.  First rendering using only Block 2, and reversing the colorways. (I would never get this worked out in my head). Me likey.


Second rendering using 3 colorways and alternating blocks of inverse color.

Third rendering using banded Ohio Star and original pattern with two color ways with inversed light/dark.  How pretty is that?


Fourth rendering using 3 colorways (linen, blue, gold) and a full-sized v banded Ohio Star--working towards fabric that I have on hand.


Fifth rendering introducing a different center patch (9 patch v 1 patch) for the full-sized Ohio Star. I am experimenting with these colorways, as I bought some Lara Beringer Paisley Palette which has a lovely medium blue with a small paisley print with some small gold accents.  I also have some soft gold fabric (Andover Raindrops (5468)). These blue and gold colors remind me of Turkish tile.   Here I have put the same 9 patch in the Ohio star (Block 1 revised) as the 9 patch in Block 2.  


Sixth rendering, substituted the 9 patch center for gold center on the Ohio star.  IN the IKIWISI (I know it when I see it) world, this is the quilt that I plan to make. It will showcase my fabric beautifully.

Seventh rendering, I put gold centers on all of the square.  My eyes are all googly!  The colorway lacks balance that the sixth rendering exhibits. Me no likey.

Eighth rendering where I put the same corner blocks on the cross block as the star block.

Notice how round the star block is.

Quilt Patterns | Free Resources

 I've not made many quilts from patterns.  I don't often find patterns that are captivating (or approachable enough) to make from a pattern. My quilting journey began 06/22/19.  I documented it in my blog posted called sewing and cursing.  In that post, I describe pulling out my long-unused sewing machines and redeploying them to quilting.

I do less cursing now.  My first quilt pattern was through a purchased, ultra-discounted quilt kit at Hancock's of Paducah.  You can find quilt kits on their site here.  It was a simple pattern with jewel tone oranges, purples, blues, greens with white.  It made a wonderful throw quilt that had all the colors of my daughter's living room.  I couldn't have purchased the material for what the kit costs. It turned out very lovely, and it was a great experience.  The pattern included a foundation pieced block.  I'm sorry to confess that FPP requires me to rewire my brain.  But once you force your brain to work in the obverse universe, it clicks.

Having said all of that, I recently completed two of Material Girl's quilts (Prairie, Windmill). Well, the Windmill is not completed...I have done all of the piecing and layout, but I have to piece all the blocks into rows and quilt top.

Because my approach to quilting is fabric first (purchase high quality close outs and then figure out what to do with them), using a quilt pattern with specifics for fabric type doesn't work so much. My fun comes from seeing quilt patterns and dissecting them, and incorporating elements.  There are many free resources for quilt patterns to include the aforementioned Prairie and Windmill quilts. Both of those were simply one block in different color renditions, but that simplicity does not diminish the value of the free pattern.

There are many quality content providers (Missouri Star, Jordan Fabrics to name two of the most prolific) that demonstrate free patterns.  I wanted to provide some internet resources for  you to check out for free projects. 

Moda Fabrics

Robert Kaufman 

Hancock's of Paducah 

P&B Textiles 

Andover Fabrics 

Windham Fabrics

I was poking about Hancocks' (my favorite place to buy fabric), and I found this beautiful pattern called Betwixt (click for free download). 


I do plan to make this quilt.


Here's another free pattern called Lacey Stars from Windham


 Here's an example of where a pattern will allow you to stretch your quilting skills by making the Lacey stars.  These stars are given as templates in the pattern.  The simplicity of the solid blocks softens the intensive piecing of the featured blocks.  I think that I will tackle this pattern too.

I hope that this post has given you a few sources of inspiration of where to find free patterns to inspire you to make something that appeals to your design eye or something that will help you advance your piecing skills.


Bluebirds

Bluebirds don't migrate. They are wonderful year round residents.  During the breeding months, the male diligently defends the territory--my patch--allowing NO interlopers.  We have 3 bird houses to choose from, but there will be only 1 that is occupied by bluebirds.  It is possible that they chose another house that is far out of our sight.  

Bluebirds typically have 2 sets of nestlings in Central Va..  However, we only hosted 1 set this year.  As they chose the bird house that I could easily see from my kitchen window, it was joyful to watch them work. Other nearby neighbors (we have 5-6 acre tracts) have bluebird houses, so they have some choice!

In the winter, there are no territorial fights that I have witnessed.  Rather, there is a gang of 5-6 of them that I have spied.  Until I put suet and mealworms out in the winter, I never saw bluebirds.  Once I started making suet, there were plenty  to see. That first winter, about 5 years ago is what prompted me to learn more about bluebirds and offer them more hospitality.

I have a colony of mealworms that have exploded in the last couple of months.  There is not much demand after the nestlings have fledged in the late summer.  Early spring, though, there are not as many insects as there are later in the summer.  The mealworms, then, become a quick meal gathering for nestlings and the parents...and then the fledged juveniles. It's hard work for a pair of parents to feed and do nest maintenance (take fecal sacs away) for a hungry gang of nestlings. It is fascinating to watch the juveniles fly to the mealworm station and beg all a-tremble for a snack from their parents.  After a short while, the parents say..."Help Yourself".  

 In the lull of waning summer days and early fall, my mealworm colony has had a chance to produce more beatles which in turn means more eggs to be created yielding more worms. It is a simple life style like most of creation: they eat, mate, have offspring, and then die.  You cannot see the eggs, but they slowly grow to mealworm larva which you can see,  You may see their molting discard before you seen the larva.

Within the next month some of my winter birds will arrive.  The white-throated sparrows have a large flock that overwinters in my area. I think that I heard one cal today.  The prefer an overgrowth of muscadine grape vines. It offers them much protection.  I will have brown creeper, yellow bellied sapsucker, warblers that may overwinter.  They arrive at various times.  I'm always happy to see them.


More on Kaleidoscope Blocks | Traditional

 In this post I discussed the traditional Kaleidoscope Block.  Like the Storm at Sea quilt, the block layout creates the illusion of curves where there are none.


 The layout above is simply a 2 color pattern that has the kaleido middle of the block mirrored.  In one block it is in the 1, 3, 6, 9  (top middle start) position and in the other it is at the 2, 4, 6, 8 position (even/odd numbers).

It's quite a pretty quilt without mussing and fussing with much else.  

My next quilt will be a kaleido.  I have ordered a book by Marti Michell.  I did experiment with the making of these blocks in Eq8.  I was able to duplicate a pattern that I was (exercising block detective skills).  The point of doing that was not to plagiarize, but rather to exercise my skills in (1) understanding how to draw the block in EQ8 and (2) being a block detective.

Would you like a coloring sheet to try you own hand at this?  You can download a PDF here.

Study the image below...see how color placement creates the beautiful patterns.  Yes, this looks much like Edyta Sitar's Alaska Quilt.  I used that example as a case study to understand the construction and the coloring of the quilt block and the quilt. (There are several errors in it). 


Of course there are several compound kaleido blocks as shown below. Deb Tucker would call this a wedge star. Until I started exploring this block, I would have never made the connection.

Controlling color in each of the pieces, to include the intersects, as well as the use of  negative space provides endless possibilities with one block. 

Star quilts and consequently star blocks are my personal favorite.

The Kaleidoscope Block To Eight Pointed Star Block set on Point

I want to show you how the unassuming square, kaleidoscope block goes from folk singer to diva.

The original kaleidscope block is a square block.  It consists of 8 equal shaped triangles with 4 corner triangles. It is similar to the "stack and whack" octagonal blocks except that it is more full dressed with corner blocks. If take out the corner blocks you have a hexagon.


This block can become more complex by subdividing further. For example you can introduce additional triangles, as noted in the pink wedges. 


You could do so again in the black wedges..I have re-rendered here using EQ*   Isn't it beautiful.  Edyta Sitar's Alaska pattern uses a variety of blocks (from simple kaleido to compound kaleido) and shadings to create her beautiful Alaska Pattern which you can find here.


As you can see, this is an Eight-Pointed Star SET ON POINT --dressed up for the opera.

Notice the difference between this and a regular Eight Pointed Star:


The set on point provides lots of design possibilities as Edyta's pattern shows.

Aids to help you make the Wedge Star (I call it Compound Kaleido!)

Edyta Sitar: New ruler from Creative Grids called Alaska.

Deb Tucker has a ruler called a "Wedge Star".

I'll update this post as I find more info.  I hope you found it helpful.


LeMoyne Star | Let's Do Math

Here is the math for computing any-sized LeMoyne Star. 

❤No, you don't have to read this post if you think your head will explode--mine almost did writing it.  I have done all of the math for you on this LeMoyne Star Calculator Google Docs Spreadsheet.  Just enter your finished block size.  You can also download the sheet for your personal use.

Nebbish notes:  I had to do a little math fidgeting using Precise, Ceiling and Floor math so that the 1/8th measurements came out correctly.  We can only measure to 1/8th, but I had to do some 1/64th rounding etc.  Ugh. To share easily on Google Docs I had to abandon more than 3 decades of Excel knowledge and figure out where everything else is in Google Docs.  It's like shopping in a different grocery store.  You have needful things but you don't f-💣 know where it is.

Ultimately, the finished size of  your block has to equal 2 x corner squares and 2 x diamond width. 


But read on to understand, intrinsically, how all of this works together.  Hopefully it will solidify your understanding, as it did for me. I have excel programmed so I can do this easily.  Further, this block is one that you have to make many times to hone your skills.  There is NO forgiven

Below is the schematic of a LeMoyne Star. Notice the relationship of each of the elements. The LeMoyne Star is composed of three components on the outside of each of its 4 sides.

  •  2 squares of equal size 
  •  1 triangle which is the hypotenuse of the square

Notice that the triangle shares the opposite side of the diamond with the square. Accordingly, we know that measurement is the same length as the square. Therefore, the long side of the triangle is the diagonal or hypotenuse of the square. Pythagoras tells us that length of the hypotenuse is the side of the square multiplied by 1.414 (the square root of 2). 

THEREFORE if we know the square size we can calculate away. How do we do that?

Consider the schematic, and then read on.


Let's do math! 

 As you can see, we have 3 elements of indeterminate length along each side. What we do know is the finished size of our block!

  •  Let X = Finished Size of Square. We have 2 squares.
  •  Let 1.414 X = the hypotenuse of the square which is the long edge of the QST. (Cut a square this size and slice on both diagonals.

 Now we know the length of the side by expressing the components of the side, 2 squares and a QST each expressed in terms of X. (You remember you past self mumbling about when would you ever use this stuff!).

 THEREFORE: X + X + 1.414 X = Finished Block Size (FB)

                         OR 3.414X (X + X + 1.414X) = FB

THEREFORE Square calculation:   FB/3.414  =  X  + .5" seam allowance for cut size.

THEREFORE  QST Calculation:  ( FB/3.414) * 1.414 = the size of the QST Square  + 1.25" seam allowance for cut size.

THEREFORE  Diamond Calculation:  FB/2 - X + .5" Seam Allowance.  It can also be expressed as .707X (.707 is 1/2 of 1.414)

When traveling the middle of the block (we were crawling around the edge before) the block is comprised of two diamonds and two squares.  

So there you have all of the calculations that you need to compute all of the components of a LeMoyne Star.

 Let's Do More Math with Real Examples! 
 
Let's compute the components of an 11" Finished Block.  I highlighted the square components so that you can easily see how they figure in each of the computations.
 
When computing elements, round up to nearest 8th because you can only measure to that discrete of a unit.  When I originally devised this scheme, I computed each of the components using the math expressed here.  Later, when I purchased my EQ8 program, I checked the math on EACH of the sizes (I did 1/2" increments)
 
Example 1:  Finished Block (FB) = 11. 
  • Square = FB/3.414 or 11/3.414 or 3.25 + .5" = cut block of 3.75"
  • QST = 1.414 x Square or 3.25 x 1.414 or 4.5 + 1.25" = cut block of 5.75 cut on 2 diagonals. 
  • Diamonds: 2 diamonds = 11 - 3.25 - 3.25 or 4.5"
    •  1 diamond = 4.5/2 or 2.25 + .5" seam allowance = cut diamond strip height (and width!) of 2.75

Example 2:  Finished Block = 5" 

  • Square = FB/3.414 or 5/3.414 or 1.5 + .5 = 2" cut square.
  • QST =  Square x 1.414 x 1.5 or 2.125 + 1.25 = 3 3/8 cut square cut on 2 diagonals
  • Diamonds = FB - 2 Squares = 2 Diamonds or 5 - 1.5 - 1.5 = 2. 2/2 = 1 + .5 = 1.5" diamond height/width.
    • Alternatively  FB/2 - Square = Diamond

If you have compound blocks, simply add more X's or 1.414 X's to compute the components of the finished block.  You will use that as your divisor. 

Let's do even more math!

Have a jelly roll that you would like to use as your diamonds?  How is that going to work?

EXAMPLE 1:  Jelly roll 2.5" strip.  Cut strip is a jelly roll that you wish to make your diamonds from:  2.5 is cut.  -.5" = Finished  Therefore we are looking for a block that uses a 2" finished diamond.

The diamond expressed in terms of the square and the size of the FB is the same.  Refer to the drawing.  Another way to express the diamond is below.

X + X + .5(1.414X) + .5(1.414X) = FB

Therefore, a single diamond = .707 (.5*1.414) of X.  .707X=finished diamond.

Our Finished Diamond = 2

THEREFORE    Square = 2/.707 or 2.828. Here we have to round down to 2.75.  

If 2.75 is our square, we know that 2.75*3.414 =  9.5 the size our our finished block.


EXAMPLE 2:  You have 3" strips that you have cut for a project that you don't wish to trim down.  You wonder, "What size LeMoyne Star can I make?"  

Single Diamond Finished = .707X is our finished diamond math.  We know that our finished diamond = 3;   Therefore our square = 3/.707 or 4.25  

FB = 4.25 x 3.414 or 14.5" finished block.


If you wish not to do math, you can simply enter FB sizes in the google docs spreadsheet until you get what you want.  I will call you a math woos!  

Now you can see why I made the calculator of you.


Windmill Quilt from Material Girl

While I enjoy watching quilting videos, I'm not always moved to make the quilt demonstrated.  Amanda Castor of Material Girl Quilts has posted two videos of quilts that I was inspired enough to make.  It was the perfect intersect of material that I had on hand with a pattern that I could use it with.

I first made Amanda's "Prairie Quilt" you can read about that here.

The second quilt,  Amanda's "Windmill Quilt", I'm in the process of making.  It is from this video:


Amanda's pattern can be found at her download page here. Here are the highlights of her pattern:

  • Written for a 10" layer cake.  
  • Pattern makes 16" blocks in 5 rows of 4 blocks.
  • Uses the eight at a time HST's to make the individual pieces.  
    • As opposed to the Four-at-a time HST, which has bias on the outside and is not a method that I use, it has straight of grain on all outside edges.  That means no stretch. Use this method with confidence.
  • Sewn together, each HST makes a Flying Goose Unit.  
  • Joined the units make hour glass units of whites and print and of prints.
  • The pattern is the perfect balance of background and prints which makes it very harmonic to my eye.

We can all agree that it is a charming pattern.

While I knew that I wanted to make the pattern,  my preference is never to use two blocks where 1 will do.  I modified the pattern for my construction to make flying geese units.  Flying geese units are comprised of a goose (middle triangle) and sky (flanking, smaller triangles).  

Each 10" square in your layer cake will yield the following:

  • 4 Flying Geese when paired with background fabric
  • 4 Sky Units
  • This pattern requires 160 Flying Geese units in two different configurations
    • FGU1:  80 units where the Featured Fabric (FF) is the Goose and the Background Fabric (BF) is the Sky
    • FGU2:  80 units where the FF is the Sky and the BF is the Goose.  
  • Each block is composed of 4 x FGU1 and 4 x FGU2.  
  • Each unit is FGU1 + FGU2 sewn where the points face out (HST created in the middle).  Each block is rotated 1 turn to create the white square in the middle and the blades in the middle.

Yes, it is 2 large flocks of geese. Therefore, this pattern lends itself perfectly to the 4x  now waste method (and frankly I would never make geese otherwise unless forced to).  It will allow you to make geese quickly and accurately. Accordingly, do yourself a favor and procure Deb Tucker's Wing Clipper Ruler.  You can find it here. (no I'm not an affiliate). It will be the best $21.20 you spent! 

Watch her video here.  Deb Tucker makes many rulers to help quilter's accelerate their learning curve and achieve frustration-free perfect results.


I used the Wing Clipper and followed the cutting requirements to make 4" x  8" FGU's.  These cuts may differ from other instructions.  These cuts make slightly oversized so that you are trimming them down with just a whisper of fabric as waste.  I don't make any bias-seamed units without using a slightly oversized method and trimming down.  Why?  Even with the most careful of handling/sewing, you can end up a little out of square/short.

  •  FGU1 [Featured Fabric is Goose]
    • (20) 9.5" squares from FF  (Trim your 10" layer cake down to this size)
    • (40)  5" squares from BF
  •  FGU2 [Featured Fabric is Sky]
    • (20) 9.5" squares from BF 
    • (40)  5" squares from FF  (Trim your 10" layer cake down to this size-- cut squares not QST's) 

Here's what each of your 4 units of 2 FGU1 + FGU2 should look like:


The above would be the block in the lower right quadrant.  Each of the FGU2 units are on the OUTSIDE of the block.  Now, I confess, that my points are not lining up quite perfectly.  I fixed this issue (although with the last remaining blocks) by employing the following technique of pressing my FG'units.  I'm going to insert the video from Carolyn Gibbs...which is quite excellent.


I employed the technique of pressing one seam in and one seam out.  My blocks nestled perfectly.  Alternatively, you could also snip to the seam line the last quarter of the seam and fold it back to create same. 


Below are a few blocks that I have already made and placed on my design wall.  Once I have all my blocks done, I will disburse colors throughout the quilt.


When I first saw Amanda's pattern, I thought I would rummage around my fat quarters as well as yardage to see what I had.  I had purchase a mystery batik package from Hancock's of Paducah. I had more than enough fabric to complete the quilt top.  The package and all of the pieces you see above. They were generally about a yard or more.  The burgundy, blue, brown, purple hues all worked together.  I had Kona Silver yardage that I used as my background.

My Construction Hacks:   I would like to share with you a couple of hacks that I used to speed the process of making these flying geese units without sacrificing any accuracy. As always, I suggest that you MAKE A TEST BLOCK (on any pattern whether you are using a hack or not) before you cut all of your material or sew all units together.  Why?  Your test block provides immediate, objective feedback that solidifies that (1) cutting of pieces is accurate (right measure and square/true); (2) units are pieced together for the block; (3) seam allowance (scant v. true) is appropriate for your application; (4) finished unit is trimmed correctly; (5) finished unit measures expected unfinished size. Any problems among any of these steps will ensure that you will NOT ACHIEVE expected outcomes or have to resort to short cuts to fix.

I'm a serial glue baster.  The "traditional" way of making 4@time Flying Geese is to set your squares in the corner (nudged slightly in for Deb's method).  I have always put some glue to keep the squares in place without any distortion. (Whether you decide to do the rest of my suggestions here, I would highly encourage you try a little dab will do you glue.

 After making a few of these I had a time saving idea.

 ⏳💡  First Pass:  I drizzled a wavy line of glue across the diagonal of each 9.5" block.

  •     Your glue needs to be inside the seam allowance our your block will not open up fully if you've glued outside the lines. 
  • You can mark your diagonal using your favorite tool or simply creasing.  I just ran a pencil line on the diagonal.
    •   No need to mark two more lines...a spritz of water will easily unset the glue if you get over-zealous. But if you are not feeling fearless, you can mark two lines until you feel confident.
      • If you do not have, get a quarter inch ruler.  I have this one .  I like the 2 sizes.  I consider these a must-have time-saver.
  • Set the two squares by pressing with hot iron. Your small squares should be securely attached and perfectly aligned on the diagonal.  If not, redo.  
    • Note that if you do not cut a perfect 5" or 9.5" square you will immediately see this at this time.  
  • Take your favorite ruler (that is grippy on the back), and slice a perfect diagonal by aligning the ruler with the corner of the large square which should by rights go straight through your small squares. 
    • If your small squares are out of alignment, square them up!  You will have problems later
  • Stack up your half-sliced geese until all cut.  Now it is time to set your seam gauge for a perfect quarter inch because you are going to production chain stitch.  A stiletto is your friend here:
    • Ensure that your first tip of your diagonal is started true.
    • Enure that the last tip ends true.

Second Pass:   Once you have sewn the half-sliced geese, it is time to add an additional square to each of the halves.  If you are marking a diagonal on the large square for your glue, do it now.

  • Set each of the seams by pressing iron on each seam.
  • Press this second seam in (as the first pass was pressed out).  (See video above).  This will allow the two geese for this pattern to nestle beautifully in the corner.  It makes a huge difference--or did for me.
  • When joining two blocks, I pressed the seam toward the dark goose.  
  • When joining pairs of geese to each other (pair 1 to pair 2, pair 3 to pair 4): Take some care here. You may need a seam hopper (foot shim) to go over the points.  Using a shim will minimize distortion.I  pressed the seams open. Joining two pairs of lying geese the points and seams should match (as best you can).

 What does this hack achieve?  Manifold benefits

  • Squares do not shift (you don't even have to slice them like I did).  Consider glue for this even if you dare not slice.
  • Once cut, the squares are now triangles and are firmly attached the the larger triangle unit.
  • Sew the edge with a perfect 1/4" seam (no need for scant as you are trimming down).  You can do this twice as fast and more accurately as you can by sewing on a line which does not have a hard backstop (your seam guide)
  • Each piece can be fed through like a machine gun belt which spits out units not bullets.
  • No need for further cutting you've done that already--just set the seam seam and press toward the sky (even if it is lighter).  You could press open, but I avoid that extra step if I can.

Prarie Quilt

Prarie Quilt in Andover's Warm Fat Quarters by Edyta Sitar

 Amanda Castor at Material Girl provided a free pattern she calls Prarie Quilt.  You can find her video here. 

I had purchased Edyta Sitar's Warm fat quarter bundle at steep discount.  I also have her "cool" bundle which I liked much better.  Most of these warm colors are in the pinky orange family.  I have a recipient in mind, but I don't really care for the fabric.  The cool bundle is totally awesome. But each of us

My quilt is on the design board, so I could not get a full pic of it--nor did I take the greatest of care in editing!

 The pattern is quite striking.  I want to provide a few observations.

  • the sharp geometric lines on this quilt are quite nice.
  • This is the first block where the seam push is not very intuitive.   
    • to get nested seams, you have to push fabric in a way that it does not naturally want to go.
  • These are 18" blocks. I think that the quilt would be prettier, to my eye, with a smaller block...maybe 12" instead of 18" which will give more of the pattern to work.

Would I make this again?  Unsure.  The seam push fight was not appealing.  It is not a design issue in the least, but rather a function of the block.  However, I'm sure GLAD that I made it.

This pattern uses the 4 at a time fast flying geese method. 

Glue Basting | An Evangelical Message from The Church of the Perfect Seam


I call myself a "serial glue baster". I am also a disciple working to advance the doctrines proposed by The Church of the Perfect Seam.  It meets anytime you are at your sewing station!
 
For any blocks that you may wish to press open, not a good option. I rarely press seams open, but sometimes not feasible not to on certain constructions. Amazon has stainless tipped glue bottles at a good price. This method is SO effective, that if you are not careful, you may have a block that is glued but not sewn! The speed and accuracy achieved by consistently using this method cannot be overstated. I have never had any problem with my machine or my needles though I have seen some express concerns about this. 

Glue basting offers many benefits over pins.
  •   You can pre-prep blocks for sewing. It may seem like more time up front, but you can sew much more efficiently and accurately. Nothing is going to shift, but you still have to mind the seam. 
  • Because you have glued v. pinned, you will not prick yourself nor will your blocks stick together. 
  • Another great benefit of glue basting is that the glue stabilizes biased seams. Impossible for them to stretch during normal handling/sewing. 
  • Fabric will not be distorted by pins. You can also match all your points perfectly. I take pins and put them perpendicular through what needs to match on my ironing surface (padded), and then glue.

Flying Geese Construction Modification:  I recently modified my 4 @ a time Flying Geese construction. (I use Deb Tucker's Wing Clipper and oversize slightly/trim down method). I run a wavy glue line (inside the seam allowance on the diagonal of the big block), and place my two corner blocks on. Then...I slice it on the diagonal BEFORE I sew it. Yep...It makes them very fast to sew with accurate seam allowance. The glue ensures that the bias is stabilized and that your pieces are perfectly in situ from your stack to under your needle. Give it a try on your next project (on a test block). (If you don't do a wavy line, you may not have enough glue on either side of the diagonal to keep blocks in situ. TOO wide, and you will have to spritz to release the 2nd over seam that is glued beyond the thread!

When it is time to add the final block, I run a diagonal wavy glue line again, place the 3rd block and then slice on the diagonal. I can stack 2 at a time accurately and cut them.

I create a large stack to sew this way and then zoom, zoom zoom at the machine. Perfect seams.  Perfect trim.  Perfect Geese.