Lemoyne Star On Point


 Here's where I am so far in my throw quilt.  I elected to set my LeMoyne Star blocks on point in the beautiful "Alfie" fabric by Este MaCleod.  It is long enough, but not wide enough.  The frame around the smaller stars was a perfect way to  pair these smaller stars (all of these were practice blocks) with the larger.  In fact, it makes them look as if they are floating. 

I need to put a border on two sides as I want to get it to 50".  In my "organic" (read chaotic) process of putting this quilt together, I need to deliberate on it.

And here it is. 


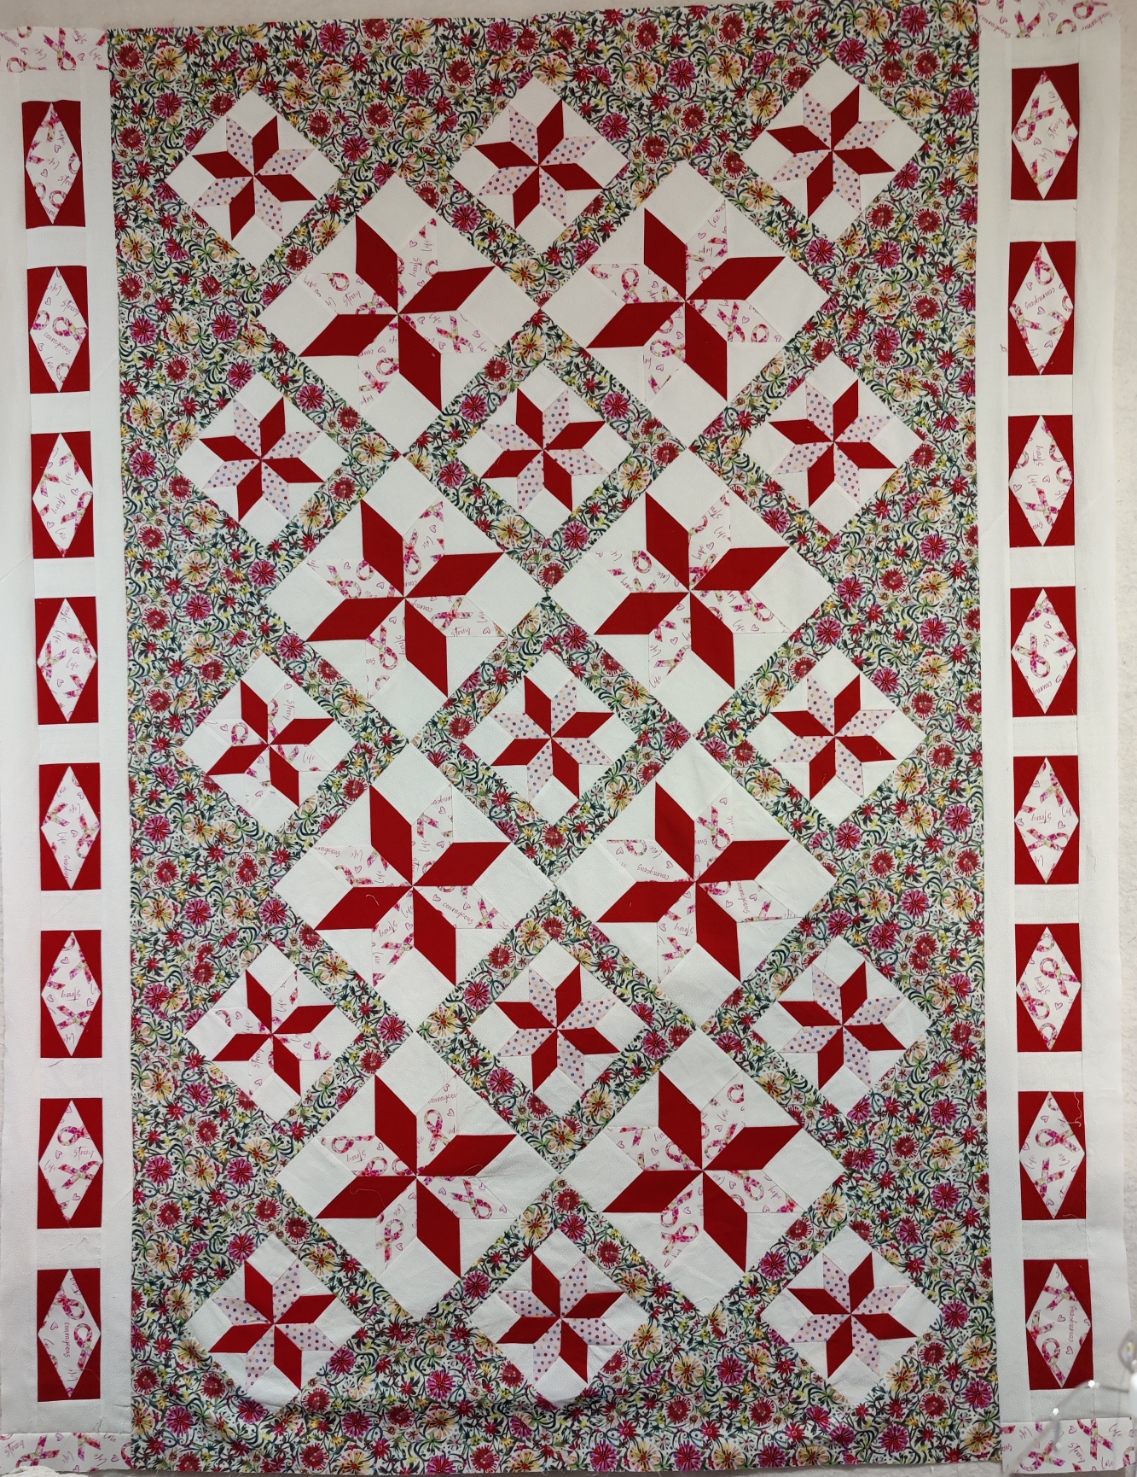
I used my Deb Tucker Diamond Rects to make 3x6 diamond rects and put a 1.5" finished border around them to get more width on the quilt. I used the rest of my ribbon fabric.  Part of me thinks I should have floated the diamonds in the backround fabric...but I was feeling as if the background was too much.

I have 3 more large stars that I will put on the back of the quilt.  I think that I'll use the same floral on the back with the 3 stars pieced in.  I think that I'll put them vertically to create a panel on the left of the quilt.  That will help with the piecing of the back as the piece is about 52" wide.

I did not figure my spacers on the diamond correctly... so I had to put filler on either end (pulled the center of the strip to center of quilt top and then filled in the rest.

Overall a good effort; one that I will be proud to gift.  It will use all of my stars--and most of my stars look quite good, though there are a few blocks where the points were clipped. It was a good creative process to go through as well as an important skill builder.


LeMoyne Star | Incorporating my blocks into a quilt


Above is my design wall.  It is such a handy thing.   In my LeMoyne star odyssey I made many blocks. The larger blocks are suppose to be 11" finished blocks.  Mine ended up at 11" trimmed.  And there was no spare 1/2".  That result is what led me on my journey.

I also made smaller stars to finish at 6.5"   Now that I upsize my insets slightly, my blocks finish just as they should:  right size and square!

I was trying to figure out how I would set the quilt.  The design wall for the spatially challenged helps in organizing and orienting blocks.  The idea of this quilt is to give it to a person close to my daughter who will be undertaking a difficult treatment.  In one of my Hancock's Mystery Print Grab bags, there was a yard of the pink ribbon fabric.  

I used the fabric as part of the star. Yes, I knew that it was not the best contrast with the white, but I consciously forged ahead.  Given that I was "practicing" (albeit not so perfectly at times), I wanted to make use of the blocks.  There are several blocks that didn't make it up on the wall.  They will be used in a "scrap" bag. 

Hancock's of Paducah had "Alfie" by Este Macleod on sale. I bought 2 fat quarter bundles as they were both beautiful and a tremendous value. It came as I was noodling on what to do with the smaller stars and the overall layout.

One step at a time.

I made a test block of framing the smaller star to up-size it to the larger blocks.  I liked it very much. It provides a cheerful frame and breaks up the white.  All of the colors in this block are reflected in the fabric.


I'm unsure if I am going to do an on point layout or straight.  I will determine once I have all of the blocks up.  For my earlier trials on the blocks, I can see disappearing points--and will see those again when the large blocks get sewn in.  I have no shame for that.  Framing a less-than-perfect block puts a lot of things right.

You can also see that diamond rectangle on the lower left.  I thought I might do a sashing/border of that.

For now, it is filling out the board.  I want to use up all of the ribbon fabric.  This process is organic for me...I'm working with what I have (fabric), building a skill (!#$!&%& traditionally pieced LeMoyne Star) and like grits, slapping it up on the wall and see what sticks.


Lemoyne Star | Final | Conquered with Impunity


I've been yammerin on about my !#$%^$%#&^ LeMoyne Star learning curve (like climbing Mt Everest in a snowstorm).   Nancy shows something here that NO other presenter has shown:  making your triangles and squares slightly oversized.

So while my techniques had improved mightily, and I mostly was getting the size block that I wanted, it is was still not where I wanted to be:  perfect.

I've been chasing perfection, and I thought that this might be the final key to my ultimate success. (It was!)

 So I set upon my scientific experiment to upsize my insets.

For a 6" block, I cut the 3.75 square for the QST's at 4". I cut the 2.25 square at 2.5".

Now when you upsize, you ALWAYS have to line up your block from the inside (inset corner) out.  I like to use the corner clipper for my squares and triangle insets to nip that small corner out. I also like to make the dot first.  By doing so, you can line up your corner, make sure your dot is on your stitching line at the inset.  I glue baste each side (I call the my dry fitting). 

My result? (I did in purple because Nancy uses purple).

Perfectly square.

Perfectly sized.

Perfect points.

Thank you Nancy.


You can see her video.  I watched so many of her videos over the years and she helped keep my learning curve in rolling Va hills. v Mt Everest.  Check her out.  You 'll be glad you did.

LeMoyne Star--Still

 I've become a confident piecer, and my blocks are coming out mostly right since I did my deep dive into understanding where the bias is in the block (and all the various construction methods)  Did you see that bias post? I think that it is pretty interesting largely because it helped me!  Maybe it will help you too.

That ole "Perfect practice makes perfect" really is on the mark.  Because the people who demonstrate this "stuff" are so excellent, we mere mortals think our first efforts should look like there's. 

While I prefer to piece on Brown Betty, I do not have as much a visual because the toe of the foot is so narrow.  I have two Bernina's.  For my newer 530B, I have the gated piecing foot, and I just got the regular piecing foot.


The Bernina 57 Gated foot rolls over any ridges and does not get caught on anything. But you cannot see the markings on the outside edge Frankly I bought a set of cheap feet, and they are just that...cheap.  The 1/4" foot did not line up accurately with my needle and I ended up with several broken needles, because the hole on the foot was so narrow.  I tossed and I have never looked back.  I also purchased a single hole plate.

Many don't like to do all of the seam marking necessary to make the accurate starts and stops required by inset seams.  Well, the #37 is well marked. (As are brands)  If you want to start perfectly at 1/4" inside the diamond shoulder, just line up the middle mark with the outside of the diamond shoulder.  Because the foot is a perfect 1/4" you are inside the corner exactly 1/4" which is where your dot or cross would be.  

My 530B will be my go-to piecing machine for Y seams.  I don't need the gated foot for Brown Betty as the foot is a perfect 1/4" (scant) and I have lovely machined guide that screws securely into the machine and keeps fabric edge where it needs to be.

 My frustration over my LeMoyne Star block has abated quite a bit.  While I have have tried other methods, my hybrid method of piecing (sew the diamonds; join the halves (locks down all bias on lower diamonds); inset the squares (locks down the biased edges on the diamonds and you can PRESS), and then inset the triangles gives me the best overall results.  

I feel that for me, it is too much fabric handling and my diamonds start to get droopy on the bias edge.  If my technique were perfect, then my results might be different.  For now, I feel like at least when I start, I will have a usable block at the end.  I have a few that were beyond rescue.

Wren Family Robinson

 If you have a backyard and take the time to notice, parents have to work as hard after the nestlings have fledged as they did prior.  Why?  The fledglings are bigger, mobile and incessantly begging for food.  (You will see them all a'quiver with beaks open). 

Late in the day, I put out some mealworms.  My colony is going on its 4th year.  My year round customers know to listen for the door to open.  I also whistle.  Well within 30 seconds of the whistle, the entire gang of the Carolina Wrens (who I affectionately call "The WRen Family Robinson") converged on the deck.  Prior to that, the fledglings were under cover.  Wrens are terrestrial  birds and low shrubs and overgrowth is where they seek protection.

There was also a molting male cardinal.  As summer wanes and insects get less plentiful, the mealworms and suet are my avian feast staples.

I also spied the Chipping Sparrow who seemed to have some peeping cheeping fledglings crowding it.

All a wonder to watch.

LeMoyne Star | Tepidly Conquered and Consolidation of Learnings--though subject to change!

 I've written several posts on the LeMoyne Star.  I'll not list them here, but you can search to blog for them, and I've included links to the more important ones. Understand that I'm not an expert.  In fact, because I am not (I'm a hack!),  I can share where I have failed; how I have contemplated that failure; and how I have remediated that failure.  Maybe you too are experiencing failures.  After much experimentation, angst, and number crunching, I have accomplished the following:

  1. My blocks now construct at (mostly) ALWAYS (now that I slightly upsize my triangle/corner insets)  1/2" larger--the proper trim size--than finished sizes instead of a the F_💣(fbomb) finished  size. I confess, though, that I don't always achieve perfect squareness. Nothing requires more careful attention than a true and straight seam line in this block.  So make a test block and be aware that seam finish (open/over) may affect your outcomes relative to your seam allowance. You will be tested by your block outcome regarding whether you seam line is truly straight and true.
  2. I have a perfect understanding of the math involved in constructing the block.
  3. I constructed a calculator for others who do not wish to go through my machinations and don't have access to quilting programs (I didn't at first which is why I undertook it). 
  4. I created a cut sheet for others using the math in the calculator.

Here are my final to date learnings on this #!$#$%^%&& block. (I have Deb Tucker's Rapid Fire Lemoyne Star and highly recommend it.  However, making this the traditional way was a personal challenge for me.) I'm far from expert, but my failures are so close to my memory, and my accomodation of those failures, I want to share those.  I'm sure I'm not the only person who has struggled.

Here are some tips PRIOR to beginning:

  1. Marti Michell's Deluxe Corner Trimmer (and marking tool).  No futzing about marking long seam lines....line it up, make a dot and trim the corner(s) so that your piece nestles perfectly with the inside diamond. I just clip the corner that is in the inset seam. 💡 You can also use the markings on your 1/4" foot to guide you without marking. I cannot see the right side of my foot with my gate, so I mark I bought a non gated 1/4" foot.  I don't have to make a mark at all!  A #2 pencil through the hole and get a perfect mark.
  2. Watch the collection of videos that I have consolidated for you on my Quilt Stuff page. I recommend Shar Jorgenson's method
  3. Consider glue basting your seams.  I found this helpful--but I do this typically with my piecing, and always with this block.  I ensure that I am applying glue to the biased edge, covering with straight of grain, and then hitting with the iron to dry.  Glue will stabilize the bias.
  4. Use a finer weight thread polyester thread.  I'm using 80wt Wonderfil DecoBob.
  5. Make a test block.  Your perfect scant 1/4" seam may need to be scantier and/or more perfect depending on how you choose to finish your seams--but if it is too scanty, you will lose your points.  
  6. Upsize your triangle and square insets slightly larger than the pattern (unless pattern has it upsized).  If upsizing, you need to fit the corner and work out, v. lining up to the outside of the block.  If you clip your corner, it will snuggle in just right.