Today my husband installed the quilt suspension system that I designed (by shamelessly coopting other ideas). I looked at all of the internet "stuff" that I could find, and I concluded that I would not buy any system sold as they were essentially DIY stuff that any could make or procure.
The three key components of your suspension system are
- Type of system
- Pet Grooming Arm Clamp on table
- Suspension from Overhead
- Rail system using an L-shaped design from left making a 90 degree turn right (or two perpendicular pieces)
- Get rings to fit on your rail so that they can easily move (like your shower curtain). I used 1" macrame rings on my 1/2" pipe.
- Single eyebolts or similar hardware for secure holding
- Suspension modality
- bungee cords
- Adjustable straps
- these are inexpensive on Amazon.
- Use a ring on the end to attach the carbiner, and run the
- Clamping Modality
- Pony 2-in 3200 SERIES (ratchet) Spring Clamp is perfect. These clamps are light weight, inexpensive, have a ratcheting clamp that quickly releases. DO NOT get a regular spring clamp. It will be too difficult to open and close.
- Run some paracord or other small cording through the whole in the handle and attach to a small carbiner.
You sew/quilt in a common area. I believe that dog grooming clamps are an excellent choice for a support arm for your quilt. They run under $40 each. You would need at least two (one on the side and one on the block) plus the clamps and a way to affix the clamps. I recommend adjustable strapping which you can easily get on Amazon. So the costs on this could be under $100. Considerably cheaper than retail alternatives.

You have a dedicated space and room overhead.
I created a video (my first;and not great, but illustrative of what I'm "splaining"~!)
An overhead system is perfect. Below is a diagram of my system.
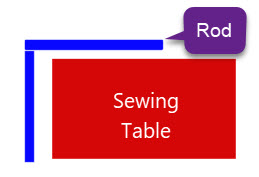
The rod is 1/2" aluminum thick walled conduit pipe that is suspended from ceiling by about 1". Free to me as it was discard. A threaded rod is in the stud in three palaces to support the conduit with pipe clamps. I could hang off of this if I wanted to.
I put 3 2" macrame rings on the left hand side and the back.
As I have webbing and hardware, I made an adjustable strap. Because my strap is adjustable, but not quick release, I used a swivel hook through my webbing to attach to the top ring. That way, I can take it down whenever I like. I also put a macrame loop on the strap (hangs freely). I attach the carbiner to this macrame loop--and the carbiner is attached to the paracord on the Pony Clamp.
I did a test drive of my system, and it is perfect for my needs. I emphasize the following design components:
- Pony Ratchet clamp 2". Do not get smaller. You don't need larger. 2" is the Goldilocks size. I started out with a qty of 4, and I don't think that I need more. Total cost $20--they are less than $5 each. There is a small hole on the handle that is perfect for slipping a piece of 1/4" paracord or other sturdy cording. If you are using paracord, cut it and burn the end of it to seal it. Paracord is a useful thing to have around. I think I have a lifetime supply. The metal "trigger" that you see releases the clamp.
- Adjustable straps. Here's a link to an Amazon Product (not an affiliate link) to give you an idea. I already had strapping. The link that I gave you has 4 of these for less than $9
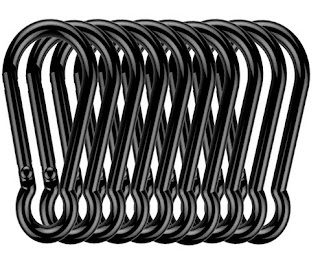
- Carabiner: Here are the carabiners that I purchased from Amazon. They work perfectly with paracord. Remember, you using this as a bridge between the paracord which is looped on your clamp to your webbing/belting. Total cost $8.99, but I only used 4 and I have 6 to use for other things. You can see that little keyhole shape at the bottom. The paracord nestles into that nicely.
- 2" Macrame Rings These worked really well. you could also use shower curtain rings, but I recommend something that will move freely and will not flick off as you work with your straps. These rings were inexpensive, high quality and move freely on the rod. MOVING FREELY is the key word. When I needed my strap to move, I didn't have to get up at all. I did have to get up to rearrange my clamp on the quilt or to get more/less slack. Hence the importance of ADJUSTABLE feature. $8.69
- Bungees might be a good alternative, but I purposely did not use them.
- 2" Macrame Rings These worked really well. you could also use shower curtain rings, but I recommend something that will move freely and will not flick off as you work with your straps. These rings were inexpensive, high quality and move freely on the rod. MOVING FREELY is the key word. When I needed my strap to move, I didn't have to get up at all. I did have to get up to rearrange my clamp on the quilt or to get more/less slack. Hence the importance of ADJUSTABLE feature. $8.69
- Adjustable straps. Here's a link to an Amazon Product (not an affiliate link) to give you an idea. I already had strapping. The link that I gave you has 4 of these for less than $9


- Lobster Clasp 1": Because my webbing was 1", I used this clasp. It clips to the macrame hook and my adjustable strap goes through the base. Amazon's price for this was crazy ($10 EACH). NOPE!!!! I have many of these because I used them on my dog leads. You may consider an alternative. I would suggest using another carabiner and a macrame ring INSTEAD of this clamp. It would be much cheaper (pennies). Put the macrame ring on your webbing (you will have two, one for the top and one for the bottom) and you will clip the carabiner though the top macrame ring on you strap and clip to the pole.

I don't know how much the 1/2" aluminum conduit pipe is. My length was 10 ft, and I would recommend that. It will likely cost under $50 to include the hardware to hang it.
Overall, my suspension system cost less than $100 if you were to duplicate it, and if you provided the labor yourself. All you need are some basic tools, know how to find a stud insert drywall anchors, and have a drill.
I cannot begin to tell you what a game changer my setup is. My test drive made me realize how much easier my quilting life is going to be with a small investment of time and money.


0 comments:
Post a Comment